All About Astro.com
  • Home
  • Blog
  • Astro Gallery
  • Astro Gear
    • Software Bisque Mounts
  • Learning
    • How to Learn Astrophotography
    • A Telescope Buyer's Guide
    • Space is a Landscape
    • Developing a Plan for Our Images
    • Best Data Acquisition Practices
    • The Task of Image Processing
    • Where to Setup Your Telescope
    • Do Dark Skies Really Matter?
    • Astronomy and the Weather
    • Globular Clusters
    • Building a Roll-Off Roof Observatory
    • Choosing a 35mm film camera
    • Great American Solar Eclipse 2024
  • About Me
  • Jay's Slide Rules
    • All the Rules
    • My Favorite Slide Rules
    • Pickett >
      • Pickett N600-ES
      • Pickett N4-T
    • All About K&E Rules
    • The Educational Value of Slide Rules

The April 2024 Total Solar Eclipse Guide for Teachers (and Non-Teachers)

​                                                                                                               By Jay Ballauer


Look to the right.  At around 1:45pm on April 8, 2024, if you are in the Dallas area, then you should just look up.  This is pretty much what you will see. 

That glorious photo is not photographic trickery.  It is an HDR composite image which shows the moon covering up the light of the sun.  This is what happens in a total solar eclipse, which will rob you of your breath unlike ANY other event that nature has to offer!  

For the record, you do not have to be in Dallas.  But wherever you are, it had better be in the Path of Totality for the eclipse if you'd like to have your mind blown! 

Being that the event happens on a Monday afternoon, you decide to slip outside to see it with your own two eyes since, being called the "Great American Total Solar Eclipse," you decide to see what's so great about it? 

But since you don't know what you are doing, you ask...

Am I doing it safely?     Are there any tools to help me view the event?    Am I in the right place?   What can I expect to see?  

Moreover, maybe you are a teacher and you have a classroom full of kids that you want to allow to go outside to watch it.   But then you find out that NONE of the astronomy teachers or knowledgeable amateurs are actually on campus; after all, they put in for subs long ago to "chase" the eclipse in the event of bad weather.   

This includes me, the author!

Perhaps school is completely called off for the day and you don't know what to do?   Don't be shocked when many of the school districts announce closures...THIS IS A BIG DEAL!

But never fear!   I leave you a COMPLETE guide to the  "Great American Total Solar Eclipse of 2024" to assure that both you and your students are well prepared for this singular event. 
Picture
Image:  The "Great American" Total Solar Eclipse of 2017
Location:  "Ground Zero" - Walmart Parking Lot, Hopkinsville, Kentucky 
Temperature: Maybe 92 degrees F
Date: August 21, 2017
Scope/Mount: 3" Takahashi FSQ-85ED apo refractor
Focal Length: 450mm
Camera: Nikon D810a DSLR
Mount: Takahashi NJP Mount
Filters: none
Exposure Info: This is a composite, HDR image, with nine individual sub-exposures ranging from 1/3200 seconds to 2 seconds.  "Earthshine" brought out on the lunar surface within the 2 second bracketed image.

Notes:  This is the "beauty shot" for any total solar eclipse.  It requires several exposures of various lengths to capture the dynamic range of the entire display (which, remarkably, your eye's can see all at once).   It will require a tracking mount and a telescope for best details.  Toward the end of this article, I discuss how to capture such an image.   Amazingly, this is mostly what you will see at the 2024 eclipse at totality, except for the earthshine.

The Rarity of a Total Solar Eclipse

Somewhere in the world, there are anywhere from 2 to 5 solar eclipses within a typical year.  But every 18 months or so, it might be a TOTAL solar eclipse.  These do not seem rare, since the Earth is a large planet.  But any particular spot on the globe only experiences a TOTAL solar eclipse every 350 to 450 years on average.  And because the planet is 75% covered in water, travelling to find the one that's happening every 18 months can be quite the journey!   
​
But, believe it or not, there are dedicated eclipse "chasers" who won't miss a single one.  All it takes is money and planning to intercept an eclipse's path, which often times is on an "eclipse cruise" somewhere in the middle of a distant ocean.   Surely you have $20 grand for an eclipse cruise, right? 

Unless you do, this means that most people will never be fortunate enough to view a total solar eclipse...and certainly not at their own location within their lifetime.  In fact, if you are from the Dallas/Fort Worth "Metroplex" like me, these are the total and annular eclipses, past and future, that would have been on your calendar if you you were an X-Man and lived for more than a millennia:
​
  • 1057 Sep 01 (Annular)
  • 1062 Dec 03 (Annular)
  • 1394 Jul 28 (Annular)
  • 1557 Apr 28 (Total)
  • 1623 Oct 23 (Total)
  • 1777 Jan 09 (Annular)
  • 1821 Aug 27 (Annular)
  • 1878 Jul 29 (Total)
  • 2024 Apr 08 (Total)
  • 2165 Sep 05 (Annular)
  • 2238 Oct 08 (Annular)
  • 2294 Mar 27 (Annular)
  • 2343 Feb 25 (Total)
  • 2345 June 30 (Total)
​
Picture
This excellent map shows the paths of all total solar eclipses across the globe in the 21st century. If your location isn't under one of those eclipse paths, then it could take another 3 or 4 centuries of maps before one does! Click on the image to zoom in. Map courtesy of greatamericaneclipse.com
PictureIf you live in Dallas and you miss this one, then two more will pass over your house in 2343 and 2345. I wonder who might be there to see it?
So for us in the DFW area, it's been 146 years since a total solar eclipse has occurred over this area.   The next TWO total solar eclipses that look to pass right overhead will be in February 25, 2343 and June 30, 2345.   Chances are pretty good that we will miss those!

For the reader, if you miss totality on April 8, 2024, then you can have another opportunity on August 23, 2044 if you don't mind driving to Montana to catch the eclipse near the horizon.  Or, wait a year later when on August 12, 2045, you can go to Northern Oklahoma and Kansas to see one.  Otherwise, to catch one, you'll be travelling to another country.  The nearest opportunity will be Iceland in 2026, Egypt in 2027, and Australia in 2028!  

There will be opportunities to travel to annular solar eclipses as well.   For example, the 
October 14, 2023 annular solar eclipse passed west of DFW, so I packed the car up with my astronomy gear and headed to Midland, Texas, for the event. But even so, having one right near you is better than a Super Bowl played in your backyard...only it's free!

As described later, an annular eclipse is a different KIND of "spectacular," but it pales in comparison with a total solar eclipse like what we are about to experience.  How beautiful it IS that it will pass right overhead for so many people in North America!  It's as if the astronomy gods picked YOU to receive this free gift.  So I implore you to enjoy it!

The Beauty of a Total Solar Eclipse

But why bother to see one at all?  Don't eclipses happen all the time?   Aren't they all the same? 

Not at all, especially not with a TOTAL solar eclipse, which is always unique during its "totality" phase.  Moreover, it is an unforgettable, almost spiritual experience for many first time observers.   So if this appeals to you - and if you are anywhere along the eclipse path - then you really have no excuse to miss what could be a transformative and even life-altering event...and if it's not that, it will most certainly be strongly emotional, something you will remember the rest of your life.    


Unapologetically - I shouldn't have to beg - a solar system body entirely blocking the light from our SUN should be something that anybody would want to see just because, you know, science!   But it's really the incomparable BEAUTY of a total solar eclipse that should inspire your participation next April.   
Picture
The August 2017 Total Solar Eclipse shortly after it began. This image, taken with a dedicated solar telescope, shows solar features not normally seen via any other means. The ever-changing solar surface is never the same, second to second.
The event will start slowly, where the moon's silhouette gradually robs us of sunlight, something that looks like the image above.  However, upon totality, you should expect an event of singular grandeur and spectacle unlike anything you will ever see in a life-time, similar to the image below. ​
Picture
Here is the 2017 eclipse at totality, appearing very much the way we saw it with the "naked" eye, as this image was taken through a normal telescope with NO filters. The coronal streams escaping from the dark lunar disk is one of nature's most incredible spectacles. Expect something quite similar in April 2024!
Picture
To interpret what we see here, let's consider this drawing of the sun.   This is a classic way to represent our nearest star according to traditional folklore, yet have you ever asked, "Why are their flames?"   Despite knowing that a star is a huge ball of flames, I never get the impression of such during sunset or sunrise when instead the sun looks like a glowing, circular orb.  In fact, if such flames exist, when would you actually witness them?   Surely it's all a fantasy, right?   Well, a total solar eclipse will show you otherwise!   

The astonishing view shown in the picture is the ever-changing solar corona streaming out from behind the totally black moon. These streams of solar radiation extend out far beyond the surface of the sun itself, and during totality they appear to stretch across the sky!   The heat of these coronal flames are upwards of 2 million degrees Fahrenheit, which is exponentially more than the surface temperature of the sun itself (10,000 degrees Fahrenheit), a fact that is not yet understood by science.  Not only that, but there will be visible solar prominences to be seen as well.  These will appear visually as small, pink flames extending just outside the sun's moon-obstructed diameter.   These smaller flames are actually plasma loops that arc along the sun's magnetic field lines.  ​
And the best part of all this is that THE SUN IS TOTALLY SAFE TO VIEW DURING TOTALITY.   There is no need for eye protection.  And in fact, I shot the above of the 2017 Total Solar Eclipse after removing the solar filter from my telescope.   It is safe because the moon blocks all visible, ultraviolet, and normally harmful light that, at every other time of your life, would be headed right toward your precious eyes. 

​So fear of your personal safety is not an excuse to miss it.  I can help with that.  In fact, this preparation guide will debunk some of what you've heard about proper sun "safety," showing you how do do most of these observations safely and smartly, giving you full confidence that all involved will have a safe and positive experience.  Likewise, a list of safety considerations and other safety concerns are summarized fully in the SIDEBAR: Proper Solar Viewing Safety at ​right. 

​Outside of "totality," when none of the sun's surface can be seen, safe filters (made specifically for solar observing) MUST be used.  But during totality, free of any eye protection, you will have as much as 4 minutes or more to stare in total AWE at our celestial neighbors performing this amazing, jaw-dropping cosmic dance!

​SIDEBAR: Proper Viewing Safety

Likely from the earliest age your parents taught you to never look directly at the sun.  On the whole, this is good advice.  Our eyes are important and we don't want to damage them.  Likewise, we know to never point a telescope or binoculars at the sun out of justifiable fears that we will burn the eyeballs out of our heads!   

However, there are obviously safe ways to observe the sun. There is no reason to fear for your safety during the April 2024 Total Solar Eclipse if the following suggestions are applied: 

1)  Never look at the sun directly without proper solar filters made for the task.  Filters of any type, whether covering your eyes directly or when used with an optical device, must be CE Certified, meeting the standard for ISO 12312-2.  Solar "glasses" should be clearly marked, not only labelled specifically for "direct solar observing," but also marked with the CE certification statement and ISO code mentioned above.  Do NOT make assumptions that any such glasses are safe, especially if you procrastinate and purchase glasses from questionable sources as the eclipse date approaches.

2)  "Sun glasses" are NOT safe.  These are made to be worn IN the sun, at the beach, while rubbing sunscreen on your hot body.  They are NOT to look AT the sun.  And even though No. 14 "welder's glass" can be used safely, if such glass is given to you for use during this event, you have no way of verifying if it is what you were told it is!  I wouldn't use it.  Similarly, homemade devices for direct solar viewing should be avoided and NOT trusted. I've seen internet sources giving awful observing advice and suggesting some wacky filter designs.   I would avoid all of it.   The possible exception to this rule would be 3D-printed filters that utilize solar Mylar or "Baadar" film. These can be totally safe as long as you trust the source and understand the physics at work.  But unless you are a seasoned-observer, then it's best to err on the side of caution ALWAYS.  Ultimately, you are responsible for your own safety.

3) Prepare early for the event.  Proper solar safety gear will (likely) be sold out months prior to the April 2024 event, so buy only from reputable vendors.  Avoid the temptation to buy (or make) solutions out of desperation immediately prior to the event.  Odds are good that there will be plenty of observers near you willing to share their proper solar observing gear during the event.  If you plan on photographing the event, then do your research well in advance to understand proper techniques to use and be ready to accept the possibility that equipment can be ruined through improper use.  Thus, regardless of what gear you do have, even if you know it is proper, acquire it and learn to use it well prior to the event.  

4)  Inspect the operational health and fitness of solar filters carefully before use.  Many filters, particularly those made of Mylar film (like in the cardboard solar filter glasses), are remarkably thin.  These can be deteriorated or suffer small pinhole damage over time - or even during manufacturing.  Filter material that is excessively creased is the sign that safety might be compromised, so testing this with a bright light source OTHER than the sun can be helpful.  Likewise, many solar filters made to fit optical devices need to be checked for tight fit prior to their use.  I've seen many solar filters made to fit specific telescopes (and binoculars) fall OFF the telescope during use.  I've had an expensive glass solar filter fall off a telescope and shatter on the ground. I've also had a Mylar filter fall off a telescope without my noticing it and was fortunate to suspect something was wrong prior to putting my eye to the eyepiece!   

5) Use indirect methods of solar observation when possible. It's difficult to hurt your eyes by looking at solar shadows on the ground or when using a variety of solar "projection" techniques.  Many such techniques are talked about in this article.  

6)  No filters are necessary during the "totality" phase of the eclipse. One of the more remarkable things about a total solar eclipse is that it is the ONLY time when direct observation of the sun is permitted; however, the sun must be completely blocked by the moon when doing it.   This means that during the short duration when the moon covers the sun entirely you should enjoy this amazing freedom to do something you've been told your entire life that you are not permitted to do.  However, the moment that the sun reappears from behind the moon, please remember that you are indeed MORTAL and the sun will hurt you.  Though, ironically, the human body is pretty smart - even the ones you have in your classroom.  It isn't going to just let you OR them just stand there looking at the sun when it comes out!  At that point, we should all just listen to what our body's are telling us!

To conclude, solar safety should NOT be a concern in terms of participation.  This is something everybody can (and will) enjoy.  Teachers and school officials should not be swayed by such concerns, even though I fear their lawyers will.  Please do not deprive ANY student the opportunity to see something he or she will likely NEVER see again, something that could change lives. Good teachers pray for such opportunities, regardless if it's in their curriculum or discipline!   
Quite simply, not only is it a transformative experience, it's just too much at the heart of what education is all about; that there is a universe worthy of exploration and understanding that goes far beyond ourselves.  
"Quite simply, not only is [the eclipse] a transformative experience, it's just too much at the heart of what education is all about; that there is a universe worthy of exploration and understanding that goes far beyond ourselves."  

Solar Eclipse Basics  

A solar eclipse occurs when the moon blocks our view of the sun, either in part or in full.  This can happen during some "new moon" phases, when the moon and the sun are on the same side of the sky from our perspective (they are on opposite sides of the sky during a full moon).  Note that you will never see the moon when they are close together in the sky due to the brightness of the sun, but when the moon passes over the sun, its black silhouette will be seen over the sun's surface.   Most such events are only PARTIAL, meaning that the moon isn't perfectly aligned to block the entire solar "disk."  When this happens, the sun will look like a moon-shaped bite was taken out of it.   The size of the "bite" during "maximum eclipse" determines the percent of "partiality" for your location...and in some cases, you could travel a few hours to increase that number.  
Sometimes, when the sun, moon and your earthly location are perfectly aligned, you can experience either a TOTAL solar eclipse or an ANNULAR solar eclipse.   The difference between these two events depends on the apparent diameter of both the sun and the moon at the time of the event.  Typically, the sun and moon look to be mostly the same size when we look up.  This is because while the solar disk is 400 times larger than the moon, the sun is also approximately 400 times further away.  Depending on the exact positions of both objects in their relative orbits, this makes the moon either slightly LARGER than the sun's apparent diameter, as in a TOTAL solar eclipse, or slightly SMALLER, as in an ANNULAR solar eclipse.  For example, if the moon is closer to the earth than typical (closer to perigee than apogee), it will appear larger to us and cover the solar disk completely.   On April 8, 2024, the moon will appear ~5% larger than the sun, totally blocking all of the sun's surface.  

For a concise tl;dr version of eclipse basics, both for solar and lunar eclipse, it's hard to beat the Vox video embedded above.


Over the duration of the eclipse - which is approximately 2 hours and 40 minutes depending on location -  we refer to the event in terms of key moments of contact, as follows: 

First Contact (C1) - When the moon's silhouette is first detected over the solar surface.  This officially marks the beginning of the total time for the eclipse event.  
Second Contact (C2) - When totality begins, approximately 77 minutes after "C1."  This marks the "beginning of totality," where the entirety of the moon has covered the sun.  
Third Contact (C3) - The point at which is sun starts to reappear, marking the end of the totality phase.  This duration depends on where along the eclipse path you are and how close you are to the centerline, but it will be 3 to 4 minutes for most people.  Consult the table below for your location.
Fourth Contact (C4) - The conclusion of the eclipse event when the sun fully escapes the moon's silhouette.  ​
Picture
 
Of course, during an eclipse event, the moon's shadow passes over the earth's surface, darkening the globe over a particular path, called the Path of Totality.   This path is known far in advance...because math...and planning for the event is easily done since getting to the path assures you will see the entire event, through all four contacts.   If you are NOT in the path, even if by a few feet, then you will not witness the second and third contact, missing totality.  It is important to understand more about the eclipse path so your can be there, with millions of others, to maximize your experience... 

The Path of an Eclipse

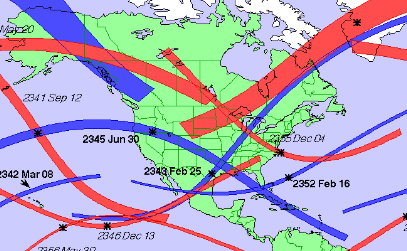
The path of a total solar eclipse is the area on the surface of the earth that will be under the moon's shadow throughout the event.  Mathematics predicts both the timing and the location of the shadow's path very precisely.   This is represented by the yellow curves on the motion maps below, which show three of the eclipses featured in this article.  Note that the dark, circular lunar shadow determines the overall path.  This shadow, the umbra, means there will be a TOTALLY eclipsed sun for anybody along the path.   Note also the circular shadow gradient extending from the umbra toward the large moving circle drawn on the maps.  This gradually lighter shadow, the penumbra, covers viewers across the continents where the eclipse will be seen only PARTIALLY.  As such, the closer one is to the solid umbral shadow, the more of the sun will be blocked by our moon. 

The first map (left) shows the path for the August 2017 TOTAL eclipse, which I featured earlier in this article.  Tracing a path west to east across the middle of North America, I began my eclipse "chase" the day prior by heading north through Arkansas (where I picked up a dear friend) and then to Missouri, where I hoped to intercept the eclipse path.  However, weather had a different plan for me, requiring me to drive east, over-night toward Kentucky, where a clear weather window would be.  I settled in a Walmart parking lot in Hopkinsville, Kentucky with nearly 200 other chasers.  The city of nearly 31,000 people swelled to over 100,000 people, according to city government estimates.  This illustrates the economic impact that such an eclipse event can have on a location, which must be taken into account when planning your "chase."   There will be crowds!

We were rewarded with the most incredible experience, which also offered the longest duration of totality of anywhere along the eclipse path, making Hopkinsville one of the more desired locations to be.   Speaking of which, it is estimated that 12.25 million people lived within the path of this eclipse, with an estimated 21 million others traveling to the eclipse path to see totality.

Compare that with 31 million people living with the eclipse path for the April 2024 Total Solar Eclipse, as shown on the map at right.   I've seen estimates of 4 million people travelling to see it.   However, I believe these numbers will be somewhat skewed by the fact that much of that resident population will still hit the roads in order to maximize the time of totality.  For example, downtown Dallas will offer 3 minutes and 51 seconds of totality, but travelling south to nearby Ennis will gain 31 seconds, something many of us find worth doing.  Likewise, April is cloud season for Texas, so the likelihood of a "chase" is greater than normal.  

Regardless of however many people travel, this is something to keep in mind when planning for the April 2024 event.  In fact, almost ALL lodging or visitor accommodations in the Hill Country region of Texas will have been reserved up to a year prior, so lodging will need to be found in the larger cities, like the DFW area, Waco, Austin, or San Antonio.   Expect higher prices!

​
The path of totality will cross over the United States from the tip of Baja Mexico, through the heart of Texas, and up through Maine in the northeast part of the country, so travelling to Texas is not a requirement.  However, totality is longer the further south you go, as well as providing an increased likelihood for better weather.   The longest duration of totality will be in Nazas, Mexico, where the duration of totality is 4 minutes and 28.13 seconds.  But viewing along the center-line of the eclipse anywhere in Texas will still offer over 4 minutes of totality, which is almost double the time of the 2017 event.     
Picture
Picture
Picture
In the center map, we see the path for the ANNULAR solar eclipse which occurred this past October 14, 2023.  This eclipse, so named after the annulus of light that appears at maximum eclipse, traced a path across North America from northwest to southeast, cutting through west Texas just after noon local time.   At over 5 minutes of "annularity," seeing the sun shining around the moon's silhouette as a RING OF FIRE is nothing short of incredible.  I intercepted this eclipse path in Midland, Texas, where I set up at a park, where the neighboring planetarium had a variety of public activities, guest speakers, and eclipse viewings.   Check out my Ring of Fire video of that eclipse, and the excitement it brings, posted just below.


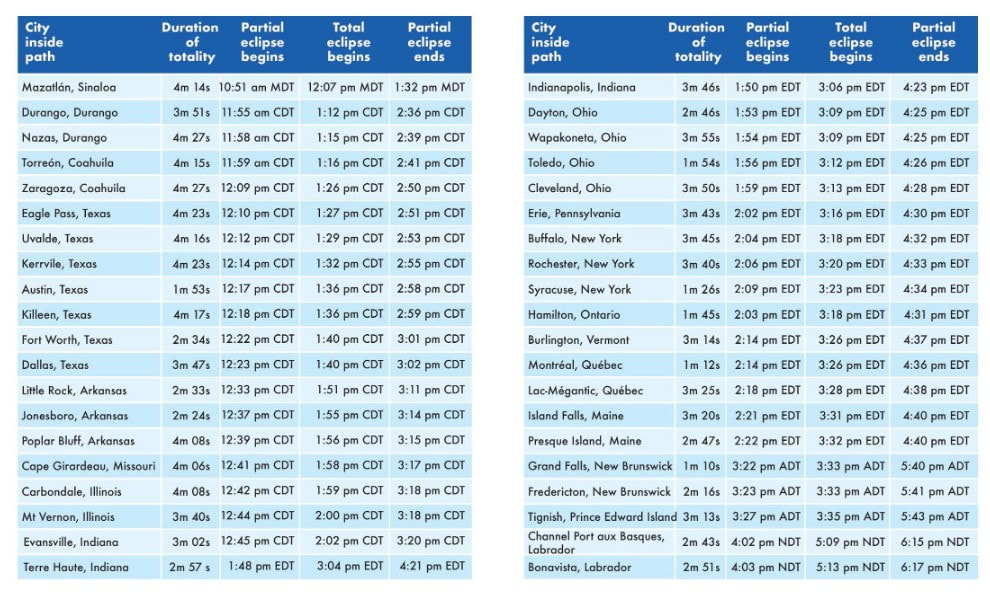
One aspect of being in the path that we should note is that being near the path's "centerline" offers the longest duration of totality.   Living in the Dallas-Fort Worth Metroplex, I know most people will try to view the event from their own backyard.  This affords convenience, of course, but it will shorten the total eclipse duration.   For example, the table above shows that Dallas will get 3m 47s of totality.  But notice that Fort Worth only gets 2m 34s.  Now this might be sufficient for you, but if you have plans to carefully observe or photograph the event using equipment other than a pair of binoculars or your solar glasses, then you will want to maximize that time.   

​Ironically, I grew up in a house near Eagle Mountain Lake just northwest of Fort Worth and it is TWO HOUSES outside of the edge of the eclipse path.  You will NOT see the show from there...you will miss it entirely.  Err on the side of caution and take a 10 minute drive to assure totality.  If you live in Denton, you should be heading south since you will also miss totality entirely if you stay there.   Same story with those living in the San Antonio and Austin areas.  Do NOT assume you are good to go!  You too will likely need to drive north or northwest to be within the path of totality.  
Because those huge cities are just on the edge of the eclipse path, there will be concerns about the amount of traffic on that day.  Traffic is bad enough on a typical Monday, but if you plan to drive near these cities while the eclipse is occurring, then you should expect a massive headache!  In Texas, specifically, Interstate 35 (especially East I-35 towards Dallas), State Hwy 67, and State Hwy 287 will be congested.  For this reason, many school districts within the path of totality, especially those along those highways, will cancel school on those days.  This is because the end of the eclipse happens to coincide right around 3PM, which is too close to the typical release time of many schools.    EDIT:  As of March 6, 2024, a large number of districts in Texas have canceled school already, including the ISDs of Hillsboro, Ennis, Corsicana, and Waxahachie.

My advice is to arrive early in the morning to your setup destination.  If there is ever a time to wake-up at 3AM, this is that time!


These particulars concerning our bigger Texas cities nearest the eclipse path can be seen in the images below.  These maps refine the paths for totality to show both the estimated time that totality will begin, as well as the amount of totality duration gained by being closer to the path's centerline.

On the left, we see the DFW area, with the Austin and San Antonio area on the right.  These maps, and the motion maps above, are courtesy of www.greatamericaneclipse.com and is one of many excellent resources online for planning your event.  
Picture
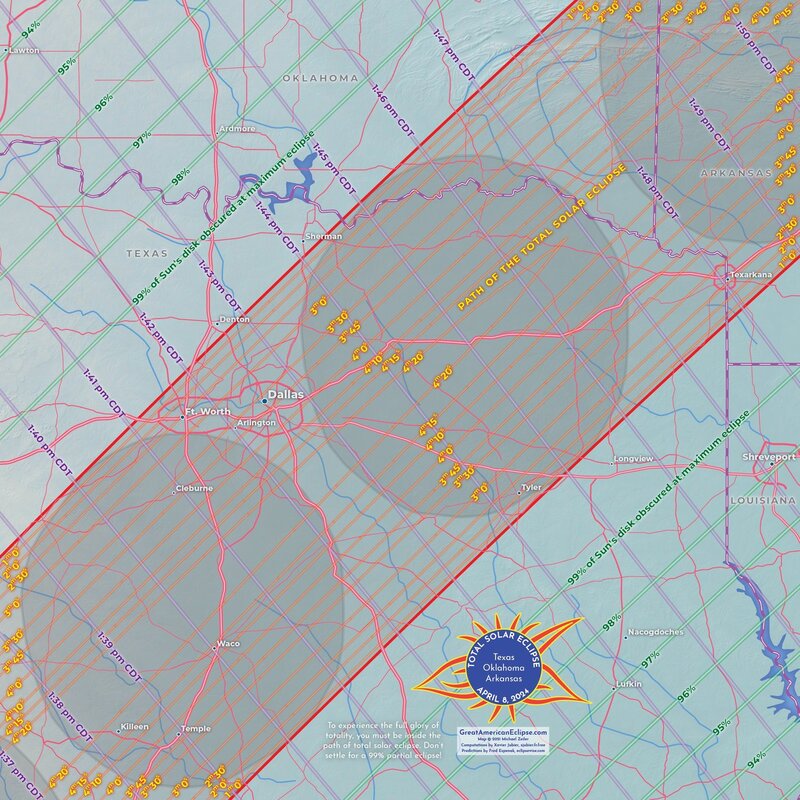
Eclipse path close-up for the DFW and east Texas areas. Click to zoom.
Picture
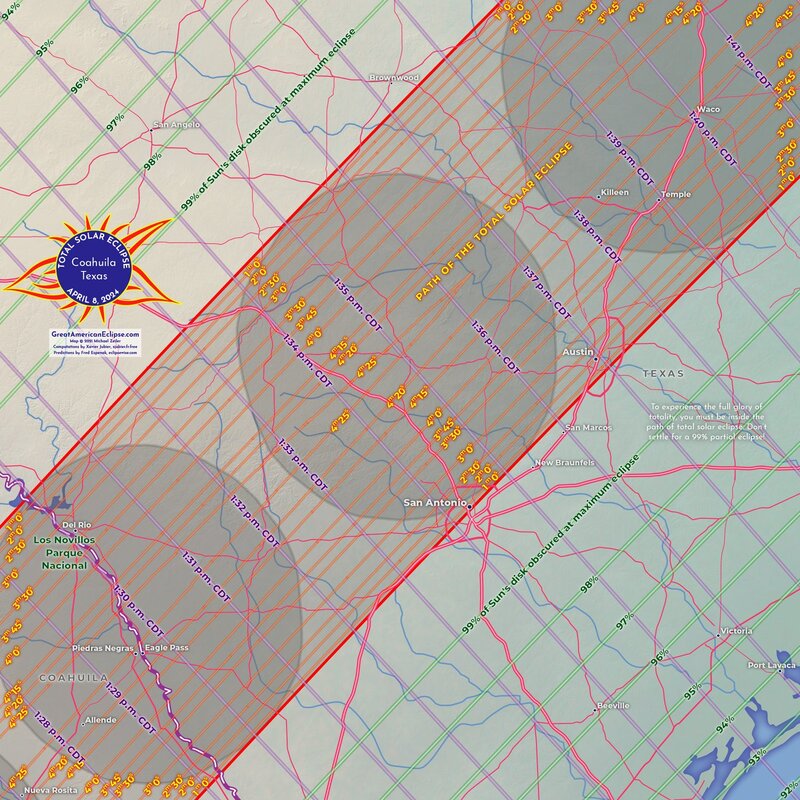
Eclipse path close-up for the Austin and San Antonio areas. Click to zoom.
Perhaps even better is this Interactive Google Map for the eclipse made by Xavier M. Jubier.  Click on your location anywhere on the map to see the particulars for your area, including times for all contact phases, time of totality, and time of partiality for those who are not in the path of totality. 

Planning for the Eclipse

PictureDuring the Annular Eclipse this past October 2023, I stumbled upon this Eclipse Day activity at the Blakemore Planetarium in Midland, TX. I also acquired three free eclipse glasses at the Midland Visitor's Center. I stumbled upon this one by total chance and decided the next day to join it. How many more events will you find if you search around online beforehand?
As we can see by the estimates of people travelling to view any total solar eclipse, planning WELL in advance of the event is mandatory.  This is not only limited to lodging and travel concerns, but also for gear purchases as well.  Do not assume you will be able to get eclipse glasses the week before the event, or Mylar filter film to make safe DIY solar filters.  These items will be sold out everywhere, including on-line. 

Likewise, you will need time for activity planning and any DIY (Do it Yourself) items you might be building.  You should also research if there are eclipse "parties" for that day close to where you might want to go.  Perhaps a local science museum or planetarium has exciting programs that day, including guest speakers (see picture below right).   Are there other teachers or friends planning an event that you can tag along with?  Has your school or district arranged for activities associated with that day - and if not, then WHY not?   Perhaps it's not too late for you to take an active leadership role in making sure your school's kids have this opportunity?   Is there a local astronomy club around to support these efforts or are there clubs along the eclipse path who are advertising eclipse day activities?   

Similarly, this article highlights several activities that might require home-made devices and/or gathering of materials.  You will not only need lead time for solar-specific materials or equipment, but also items needed in their construction.  If you 3D print your own filter frames, then you wouldn't want to be out of filament (I recommend PETG) or you might need time to find a good design.  You'll also see many solar projection techniques that require some forethought, material purchases, and execution.  

Weather planning is, of course, critical.  The April 2024 Total Solar Eclipse will occur during the rainiest and cloudiest month in Texas.  While a school teacher who's on the job may not have travel options, they can definitely have Plan B contingences and activities at the ready should they be needed.   And if you are like me, a school teacher who will be taking the day off to chase the eclipse (in case of clouds), you will need to plan for multiple sites along the eclipse path in your search for clear skies.

Equally important, time will be needed for observation planning and practice. Because the eclipse is a timed event, you have ONE shot at certain observations.  You will need time in advance to not only learn what stages of the eclipse might be of interest - particularly as a photographer - but you will also want to budget time and energy to practice beforehand.  This is especially true for somebody like me, who will have an array of complex gear that must be working without fail on the day of the event.   I will even be planning for redundancy with my observing setup in the form of carrying extra, charged batteries, camping equipment, and tarps/covers.   In fact, I have a checklist/packing list ready to follow when I load up for the chase (see SIDEBAR: Equipment and Packing List at right).

As a newbie solar observer, you will want to practice some observations of the sun in the days prior to the event. You can learn what sunspots are and watch them over two weeks prior with your solar glasses or filtered binoculars.  You can view online solar videos in white light and "h-alpha" wavelengths to see how active the sun is beforehand.   Or maybe you want to try some basic photography, like doing a wide-field, filtered shot with a camera on a tripod OR practicing with a cell-phone held up to the eyepiece of a filtered-telescope.   

For teachers, this pre-planning becomes critical, especially if the eclipse is to be a part of a broader unit of study or if it requires lesson planning or correlation to your state's educational objectives.   Some of my favorite classroom activities and eclipse-preparation items can be found in the links that follow:  


https://eclipse.aas.org/sites/eclipse.aas.org/files/Eclipse-Activities-for-Educators.pdf

https://www.jpl.nasa.gov/edu/teach/tag/search/eclipse

https://www.teacherspayteachers.com/Product/Solar-Eclipse-2024-Activities-The-Great-American-Solar-Eclipse-3294421

https://theowlteacher.com/7-engaging-eclipse-activities/

https://www.teachingexpertise.com/classroom-ideas/eclipse-activities-for-middle-school/ 

​SIDEBAR: Equipment and Packing List

If you have the luxury of witnessing the April 8th eclipse at home, then you shouldn't need to do anything special other than to make sure you have everything you need, have everything setup, and practice what you want to do in advance. 

That said, you've chosen to enjoy the eclipse like a hermit!

When reading through this article, especially one that hopes to encourage all the wonderful educators out there, you should pick up on the sense that this eclipse is as much about the people as it is anything celestial.   So I would encourage you to be anywhere other than at your home. 

Likewise, April in Texas means that you will need to have a "Plan B" in place where you might have to take the show on the road, venturing away from the house in search of a nice, cloudless, high-pressure area along the eclipse line.  

At that point, you need to have a packing list. Trust me, you will forget to bring things you might have needed, and when you are an astronomer, much of those things cannot be found at a local Walmart.  

For me, I like to write out a list of items required, especially since a trip for a solar eclipse during the day is MUCH different from what I pack when I do astronomy at night.  My setups are different, my equipment and tools are different, I have a variety of special purpose items that must be brought with me, and much more.   Such a list also helps me streamline exactly what I need so I'm not tempted to bring more than I really need...such as every telescope I own.  

My typical travel list for an eclipse looks like the following:
Picture
Finally, an eclipse party isn't a lot of fun if you are the only one there.  If you plan to to enjoy it with specific people, make sure they know about it!   As an educator; educate.  Learn all about it yourself and then share the knowledge with others.  As an amateur astronomer who is a veteran and host of hundreds of public observing events, I have experienced sincere gratitude from an untold number of thousands of people who I have given the opportunity to observe with me through my telescopes, binoculars, and real-time video displays.  I have had people scream aloud with joy during the middle of the night because they were able to witness things they didn't know you could see.   I have had elderly people weep while seeing Saturn for the very first time through a telescope.   And when I am setup among hundreds of people at an eclipse event, there won't be a person around who doesn't see all my gear setup and ask me a thousand questions.   I am an educator, first and foremost...and the spectacle of the eclipse itself is made all the more wonderful when I count the number of people I impact while doing it.  Please try to do the same!​
Picture
I will mention this throughout the article multiple times to remind you that if you want to see the amazing views that totality brings, then you MUST remove your eclipse glasses and all filters from your optical devices. This is completely safe; don't be deterred by others telling you it is not!

Methods for Observing the Eclipse

PictureAn activity known as "Sharp and Fuzzy Shadows," objects with perpendicular (right angle) edges will cast shadows either sharply or softly depending on how it is oriented with the crescent shape created during the eclipse. Cutting out a sheet of paper with the right angles (or using a builder's framing square) will reveal shadows like you see here. Image courtesy of Smarter Every Day on YouTube.
Once you've settled on your desired observation location, there are a variety of ways to enjoy the eclipse.   Many of these methods do require a little bit of planning, but for the most part are easily accomplished.   I will describe these methods from easiest to most complex, but you should know that even the most archaic method provides wonderful results.  

Nature Observations

​When the sun leaves a shadow on the ground, it takes on the shape of whatever is blocking it.  So you would expect the shadow line left by a building's roof to be crisp and distinct.  But on closer observation, you might notice that there's a feathered edge to it.  The is because there are two parts to any shadow - the umbra, which is the part of the shadow totally blocked by the building, and the penumbra, the part of the shadow only partially blocked by the building.   As such, there is a softness to the shadow edge you might not expect.   And in fact, in an eclipse, you will notice shadows becoming much more sharp as totality approaches; this because, the diminishing size of the sun means less of a penumbra to soften those shadows.  Put another way, if the sun was a single point source of light, then there would only be an umbra, with a perfectly sharp border between shadows and sunlit areas. 

Similarly, on a more global scale, when the moon totally eclipses the sun from your location, you will find yourself in the umbra of the lunar shadow.  However those just outside the central path of the eclipse, where the sun is only partially covered, will be in the lunar shadow's penumbra.   So to see an eclipse without some of its light always showing, you need to get to the path of totality, where the "magic" happens. 

In more of a myopic observation, when the sun is partially eclipsed, the shape of the penumbra changes to match the actual shape of the "bite" taken out of the sun.  This can be clearly seen by looking within the shadows of trees.  When the sun is uneclipsed, you would expect to see the shadows looking like the individual leaves themselves.  However, when the sun is eclipsed, the broken patterns of the shadows show the eclipse shape in repeated patterns through these shadows.   So, the first way to observe the sun during an eclipse is to stand under a tree and look down.  Placing a large white sheet on the ground makes the effect strikingly obvious!

In a similar way, you might notice that your own shadow will look unexplainably strange!  We can see why this is through an experiment (see right), where you should set a large white piece of cardboard on a easel to serve as a backdrop, facing the sun.  Then grab an "L" shaped object (cut-out cardboard, carpenter's square, et al) and hold it as different angles, allowing the shadow to cast onto the white backdrop.  You will find that all parallel edges of the "L" shape will be one type of shadow (either sharp or fuzzy) while all perpendicular edges will be opposite.  The no-preparation way to do the same activity is just hold out your arm in different orientations.  The sharpest shadows that your arm casts will the 90 degrees different than the fuzziest shadows.  So give it a try!   Is there a connection with the orientation of the shadows and the partial crescent shape of the sun?  What is it? 

​Another natural observation, known as shadow bands, occur when the moon almost entirely covers the solar disk, both before and after totality.  At these stages of the eclipse, light rays are less dispersed on the ground (more in focus) and the shimmering of the atmosphere causes waves in the light against objects.  And this will be directional in the same manner as the "Sharp and Fuzzy Shadows" activity talked about above.  The effect of this can best be seen on a flat background (such as a light and uniformly colored blanket laid on the ground).   Just as the earth's atmosphere is responsible for the twinkling of stars at night, in this event the light from the sun (in it's thin crescent shape) will shake and roll in somewhat parallel waves.  When seen on the ground, the effect can make it look as if the shadows themselves are moving.  Many observers liken it to little "snakes slithering on the ground."  The best time to see them is right after totality, just after C3 contact, since your eyes are somewhat dark adapted and are better equipped to see the lower contrast "snakes."  It's freaky and it's cool!

As such, without any other preparations, these phenomena become something wonderful to experience and require very little or nothing in the way of equipment or preparation.  The most special, "natural" events happen around totality, which I will talk about in its own section later in the article.  But if the entire event lasts nearly 3 hours, then rest assured there is plenty of fun to be had!

PictureThe pinhole camera works because light travels in straight lines from the top and bottom part of the sun. So when light passes through any aperture (like a hole), the scene inverts itself on the "screen" of the camera. A shoe box works well. Cut an over-sized hole and tape aluminum foil over it. In this way, you can experiment with a variety of pinhole sizes without ruining the box. Put some plain white paper at the back of the box to serve as a screen. You can make the box light-tight by using the box lid and then making a "view-port" for the eye. I would put the view port on the side closer to the screen. A light-tight box perhaps can allow users to see any scene projected onto the screen, not just the sun. If photo-sensitive film is used over the screen, an image is permanently formed. This the nature of the "camera obscura," which were the first cameras ever invented.
Indirect Observations

It is quite easy to view the sun indirectly, which will always assure safety.  These methods involve the projection of the sun's image on a "screen" of some kind. 

First, taking what we understand about a shadow's umbra and penumbra above, it becomes easy to see an eclipse's progress by forcing the sunlight through a small hole.   As such, students can construct a 
Shadow Box or Pinhole Camera  by cutting a hole in the end of a shoe box and looking at the shape of the light within (see image at right)    It is a great and easy project to do, allowing students or adult observers to take more of an ownership in their learning. 

The concept of the pinhole doesn't require a box.  Any solid material with a hole in it can be used when you allow the sun to shine through the hole...it will create the sun's image on any material you chose to use as a screen.  

But for an easier, quite amazing activity, bring a 
kitchen colander with you.  For those that don't spend much time in the kitchen, a colander is a metal or plastic bowl with holes in it, used to drain the water out of foods like pasta or for washing fruits and veggies.   When used during the eclipse, each hole in the colander projects its own little pinhole camera towards the ground.   The effect is best with circular holes as each hole mimics the shape of the sun; however, I've seen come cool colanders where all the little holes are more fancy shapes.  So it looks pretty awesome to see a bunch of Texas-shaped eclipses spread across the ground! 

If you want to turn the colander observation into an activity for kids (or adult-kids like me), then make your own signs by drilling or punching clean holes in a sheet of metal, cardboard, or thin plywood. While you wouldn't be able to use it in your kitchen, it would be entertaining to see the partial phase eclipse effect in every hole of a sign that spells out your own name!

Finally, we have a method of observing that uses a device called the "Sunspotter," shown in the image at right.   What we have here is technically a "folded telescope" and as such we could talk about it in a section below.   While most people wouldn't offer out the $550 for one of these devices - I've heard there's a slight discount for teachers - it's the principle that you might find interesting.   

By "folded," what we mean is that it's like a typical refractor, only with a series of ​mirrors that bounces the light path around the triangular shaped frame.   Aiming the scope is easy by using the protruding dowel just above the circular main objective (where the light enters).  The sun will appear on the white paper (clipped in place) once that dowel casts no shadow.  There is an eyepiece at the end of the light path which magnifies the solar image, so the image covers the entire size of the paper.   

What is terrific about being an actual, focusable telescope is that any sun-spot activity is clearly shown in the image.   As such, it's a wonderful instrument for solar observing in general - it's not just for eclipses!   That certainly helps in justifying the cost of the expensive device. 

I've used this device many times in educational and public events.  It's a wonderful tool, especially since it is very safe.  Unlike a conventional telescope, there is no way for a kid to stick his or her head in the light path and risk blinding themselves, something that responsible adults must protect against if using a telescopic method.  It's this safety factor that makes me want to talk about it here, as it certainly is an indirect form of solar observation requiring very little in the way of setup, unlike a telescope.
Picture
Direct Observations

Looking directly at the sun, as you've been told, is a very, very bad thing; and honestly, your own body tells you this when you try staring at the sun at all.  It just won't let you!  But obviously it can be done safely and securely without burning your eyeballs out of your head!   

​In all cases, it requires a filter for all solar observations OTHER THAN during the totality phase of the eclipse.  For the most part, direct observations are made by most using a pair of solar eclipse "glasses."   These are made of cardboard with properly rated Mylar filter material, usually purchased in bulk packs.  Cost is likely a dollar or two for each pair of glasses.  

The glasses are worn over the eyes and during the eclipse; all one needs to do is look up.  Care must be taken to make sure the cardboard glasses fit well to the face, but otherwise are safe to use even with young children in groups.  Below are images of my young daughter and her schoolmates during the August 2017 event (which was only a partial eclipse at her observing location).  Note that the kids are holding the glasses close to the face, which is the correct way to use them.  However, care must be taken not to puncture the Mylar, especially if trying to clean sweat off of the thin film.  So, if supervising an event with kids, the adult teacher or sponsor should inspect the glasses between uses.  I typically instruct the kids to let me clean the glasses between uses. 
These might be safe to use for multiple solar events, but care should be taken to carefully inspect the glasses before any use.  Such glasses are better considered as "disposable," not intended for a life-time of solar observations.  At their price point, I would encourage you not to be cheap - just buy new ones of each solar event.  

There is another form of solar eclipse glasses that look more like typical sunglasses, only equipped with plastic lenses that are real solar filters.  These glasses will be specified as ECLIPSE glasses and care must be taken to be sure they carry that label, in addition to the aforementioned CE and ISO certifications.  Again, do NOT use normal "sunglasses" to look directly at the sun;  though, fortunately, the human body's pain notification system will let you know there's a problem prior to doing too much eye damage.   These glasses will cost around $10 for a pair.  

Some solar eclipse glasses (or viewers) combine a 2x magnification as well.   One such pair from Celestron, linked here, is a cardboard "foldable" version of the normal eclipse glasses which aren't worn, but rather are held up to the eyes like binoculars.   I highly recommend these because the extra magnification is useful to see the sun slightly bigger than normal.   In this case, "normal" is about the size of a full-moon, which might be sufficient for you, but the 2x magnification factor will make everything look twice that size.  Celestron sells these "Powerviewers" individually or as a part of a solar observing kit, which is definitely worth consideration.  

Finally, a real pair of binoculars can be used for a solar event if they are properly filtered.  Many astronomy suppliers make custom filters for common binoculars models, which can be purchased on-line at stores like Starizona, Adorama, B&H Photo, and Orion Telescopes, among many others.  Alternatively, there are people online who can make 3D-printed filters for you, especially for non-standard or older models of binoculars.  Because I have a 3D printer myself, I printed my own and attached the Mylar filter material (Baader solar filter film) myself.   This film can be purchased in sheets of various sizes.   

Alternatively, this film can be cut oversized and bound to the binoculars with rubber bands or nylon zip-ties.   In many ways, this is preferable to many solar filters with enclosures (rims) that are made to "fit" the business end of the binoculars.  Such filters routinely fall off, which is a safety concern.   Securing the filter material directly with rubber-bands, I would argue, is better.  However, the risk of ruining the filter material is MUCH greater when attached this way.  It also causes the film to crinkle without a frame to keep it taut.  As such, crinkled filter material can promote light-invading cracks.   Therefore, if you apply such filter material in this manner, it should most DEFINITELY be for SINGLE USE ONLY.  

Concerning binocular use in general, models can vary in magnifying power, typically anywhere from 7x power to 20x power.   I recommend something no larger than 12x power if holding the binoculars by hand.  Greater magnifications make binoculars more difficult to keep steady.  Many creative observers fashion outdoor/patio lounge chairs into a binocular station simply by attaching a movable binocular mount to the chair.  Leaning back, relaxing, drinking a beverage, all the while observing with no hands...that's the life!

As I said, during totality - when the moon completely blocks the sun - no filter is required.  So if you are using binoculars, then remove the filters at totality.  This yields one of the best views of the totally eclipse sun that there is.  Those several minutes of unfiltered freedom with binoculars will be one of the most memorable experiences of your life.  Some people cheer.  Some people cry with unexpected shock and awe.   Others will drop to their knees in worship of a higher-power.   All people will enjoy it.   
PictureThe left side of the image shows the sun's chromosphere taken with an h-alpha solar telescope. The right side is an image taken with a typical white light solar filter. The photosphere is the surface of the sun visible to our eyes when safely attenuated. The chromosphere, which lay above the photosphere, is revealed within the hydrogen-alpha spectrum. - Image courtesy of Alan Friedmann at avertedimagination.com
Telescopic Observing

For those with a telescope, you likely already know that it can be used safely to observe the sun if properly equipped with a solar filter.   While I would not go out and purchase a telescope in the months prior to the event - they can take awhile to figure out and such a singular celestial event is no time for troubleshooting equipment.  But perhaps such celestial events like this will encourage you to buy one AFTER the April 2024 event.   If you are around for the years 2044 and 2045, you will have two more chances to use it for total solar eclipses over the United States.   Seriously, telescopes are versatile instruments for viewing all types of celestial objects, including planets, stars, and deep sky objects such as nebulas and galaxies.   But if you had a telescope and ONLY ever viewed our moon, it would be totally worth the price.   

So get yourself a telescope.   But wait until after the eclipse!  

In the meantime, there will be plenty of telescopes anywhere there is a large group of eclipse observers.  So, as I discuss telescopic observing of the sun, I would want EVERYBODY to know how astronomers like us will be using them.  In this way, you will know when you are in good hands and when to run away! 

Telescopes and Their Purpose

The central purpose of a telescope is to gather light.  Larger apertures (like 8" inches or more) gather much more light compared to small ones (like 3" or less).   This is important for many objects in the night sky.  But, obviously, light gathering is not a problem when observing the sun.   However, there are several other factors of a telescope that will be useful for solar observing.  
  
First, a telescope can utilize eyepieces of varying focal lengths to change the magnification.  This allows the user to scale up the telescopic view in a way to see objects close up. During a solar eclipse, it allows you to customize the field of view to see what might be of interest by zooming in tighter on small features like sunspots or zooming out to take in the full solar/lunar disk.  And for general astronomy, such a well chosen eyepiece in a telescope allows amazing details on the planets, as well as wide, Milky Way vistas and huge clusters of stars.  And on the moon, the correct eyepiece will show you craters INSIDE craters. 

Second, many telescopes have electronic drives to move the scope in a way to keep the object in the eyepiece view.   This is extremely useful when you want to point the scope at the sun for the entirety of the ~3 hours of the whole eclipse.   This hands-off tracking ability on the sun is convenient and allows sharing the telescope with others without much need to adjust the scope.  Likewise, because you know that the telescope is always on the object itself, it frees you to be social and perhaps do some other activities as well.   

Third, telescopes can be equipped with a few different types of filters that yield differing views of the sun.  It will not be apparent when using solar eclipse glasses that there is detail to be seen; however, at magnification, the telescope can show many of the different features on the sun.  Most of the filters, certainly ones I've mentioned as Mylar film material or any such filter that is made from glass will give a "white light" view.  These filters offers us the ability to see everything the sun offers within the human's visual spectrum by attenuating the light by a factor of 100,000 or more.  Don't be confused on eclipse day, however.  There are many different types of these white light filters and all of them tend to impart a particular hue to the view.  Some are a natural looking yellow color - though the sun is actually white - and some even make it look purple.    Regardless, all such filters will go on the front, aperture end of the telescope.  It's easy to see if a telescope has the filter on it just by checking for filter film (which looks like foil) or a dark glass element on the outside of the scope's business end, where the light enters the scope. 

In some cases on the observing field, you may witness somebody using a telescope that does NOT have a filter on the front of it.  Yet, they haven't burnt their eyes out!   In that case, they might be using what is known as a Herschel Wedge.  This device will be located near the eyepiece, just ahead of it.  It uses a special trapezoidal-shaped prism to allow the majority of the sunlight (including all UV & IR light) and heat to refract safely away from the optical axis.  This light and heat travels to the back of the device and hits a heat "trap," usually made of a form of ceramic akin to the heat-tiles on a Space Shuttle.  The 4.6% of light that doesn't go to the trap is directed toward the eyepiece, first passing through an ND3 neutral density filter to further reduce that light's total power. 

​The effect is a view through the eyepiece similar to the white light view using typical glass or solar filter film on the aperture of the scope.  The advantage of the more expensive wedge is that it's far more durable and longer-lasting than Mylar filer "film" or Baader material and is far more unlikely to fall off the telescope like a typical front-fitting solar filter might.   And if it were to fall of the telescope, the entire eyepiece would go with it.  

When you see such a thing among your eclipse observing contingent, be sure to ask the owner what filter he is using.  If he says the words, "Herschel Wedge," then you can shake your head in positive acceptance and then beg for a view!   

What's to See?

Regardless of the type of white light solar filter being used, it will show the granulation of the sun's surface (the photosphere), which are very small rising and sinking convection cells.  You may also see cooler patches (AKA "sunspots") that might exist on that day.  Such sunspots are often seen in groups, which can be many times the size of our earth themselves.  Bright areas of concentrated magnetic energy known as faculae can also be seen with a typical white light solar filter.  

Beyond that, there is a special type of telescope that is permanently equipped to show the sun...and ONLY the sun.  These scopes are often known as hydrogen-alpha solar telescopes (or just "h-alpha") and serve not only to attenuate the light akin to a typical solar filter (by a factor of 100,000), but also to narrow the spectrum to a very thin sliver (often less that 5 angstroms wide) where hydrogen's singly ionized wavelength (656.3nm) glows.  At this spectral line, the following features of the sun's chromosphere can be seen:
  • Prominences - Gas plasma that curls up from the surface, arching along magnetic field lines.  They show themselves at the edges of the solar disk.
  • Filaments - These are prominences in the middle of the solar surface that are coming more toward the observer.  They look like giant, dark cracks in the solar surface. 
  • Spicules -  Short lasting, yet small plasma jets that rise and fall across the surface.  They appear as darks hairs entangled with the solar surface. Also known as "fibrils" or "mottles."
  • Ellerman bombs - Explosions around active regions (sunspot areas) that show themselves as small white hairs around those areas conforming concentrically to magnetic field lines rising from the surface.  ​
  • Flares - Often mistaken as prominences, flares are huge ejections of plasma from the solar surface.  Particles from the flare are ejected into space.  When headed toward the earth, these particles are attracted by our north and south poles and gives rise to the magnificent auroral displays in our own atmosphere.  The largest of these, known as CMEs or Coronal Mass Ejections, have the potential of causing satellite disruption. 

As such, if you have the opportunity to observe through an h-alpha solar scope, it's nothing short of amazing!  If you see me, I'll let you look through mine; and most other avid solar observes are usually quite good about sharing views as well!  

One more, very rare type of solar telescope uses a CaK or Calcium-K line filter.  This telescope shows only a thin sliver around 393.4nm of the K-line of Calcium. It can show a lot of detail around active sunspot groups, but otherwise is mostly disinteresting - it's more for photography than visual observing - the Calcium-K line is slightly outside the human visual spectrum.  But you shouldn't be surprised on eclipse day if a bunch of astronomers are around and you get to view the sun through one - you will know by the very blue look of the image.

The combination of solar features and views you can see when around a typical gathering of eclipse seekers makes it well worth the effort to find a place where they might be.  Aside from the incredible views of the eclipse itself, I have yet to see a single person look though my telescopes, especially my h-alpha solar scope, and NOT be absolutely blown away by their first time glimpse showing them what the sun literally is...a huge, fiery star!
PictureAn eyepiece projection setup is perfect for eclipse viewing, offering a large, detailed projection of the sun's photosphere in a safe manner. Details of sunspots and the eclipse's march towards totality can be monitored by all, acting almost like a television.
Typical Telescope Uses 

The usual way to view the sun is the same way you would observe stars at night; that's to put your eye to the eyepiece.  But for the sun, such a scope must utilize a solar-filter while the eclipse is in any partial phase.  This would involve a setup similar to any of those mentioned in the last section.

When looking through a telescope that's not your own, try not to touch anything with your hands unless the owner lets you do so.  Kids especially want to grab at the eyepiece.  Most likely, you will have to focus the telescope for your own eyes, so make sure you ask the owner if he or she will let you do that.  If wearing eyeglasses, try to keep them ON, as your corrected vision will more likely match the current focus setting.   Removing your glasses will require a refocus of the telescope.  And for heaven's sake, don't be wearing your solar eclipse glasses at the eyepiece.  Remember, it has it's own filter!

When you see the sun - or any object when looking at a telescope - try to touch the eyepiece very lightly with your eye, moving it in, out, and around until you see the view.  Then, hold still and be patient, allowing the vibrations of the telescope to settle.  Linger longer over the view and you likely will see the image waver a bit, which is usually the atmosphere causing a shimmering or bubbling to the view, a dynamic we astronomers refer to as "seeing."  Good observers will try to catch details between the shimmers, which requires longer than the five seconds that most people usually spend at the eyepiece.  Keep in mind, if we let you look through the scope, it's probably because we want you to see and appreciate the view like we do.  It's completely fine to take a little time to do that.  

At totality, when it is safe to remove the solar filter on the telescope, then viewing can continue as normal, offering amazing views of the prominences in detail on the edge of the darkened solar disk.   But at that point, it is very likely that the owner of the telescope will have other plans for the telescope.  Nor will you care as your gaze will be transfixed with jaw agape when you look up! 
 
Any such telescopic setups can typically replace the eyepiece with a CAMERA instead, where the telescope becomes the equivalent of a really long telephoto lens.  A wide array of cameras can be used, such as DSLR or mirrorless "DSLM" cameras.  Yet, other more advanced observers may use a camera that might look less like a camera, and more like a colorful hockey puck.  Such cameras are designed specifically for astrophotography and will usually hook up via a laptop computer, controlled completely from it.   On eclipse day, the typical clue such a camera is being used is to look for people using a table with a shield or cover on top in which a laptop can reside, protected from the glare of the sun.  When we use such cameras, we will often hunch inside the little cubby hole with a dark blanket on top of us!  

Of course any camera being used has the potential to image something other than the sun.  While I will talk about ways to image the sun later in the article, you might find it amazing what such setups can do on the night sky as well.  If so, then please check out my main astrophotography home page, my AstroGallery of space images, and various articles I've written about astronomy and astrophotography on the Learning page.  

Finally, one last form of telescope usage is an indirect method of observing the sun known as eyepiece projection (see right).  This involves the use of a refractor telescope WITHOUT a filter.  In this setup, the sun is permitted to go through the telescope; however, at the back end behind the eyepiece, an image of the sun is projected onto a white transparent screen, usually a see-through, translucent velium material.  The area between the eyepiece and the screen is often blocked off inside a cone so that people cannot wonder by and accidently stick their head where it doesn't belong.  Often at an eclipse event, you will see several such setups that project the sun throughout the event.  It's safe to view and allows for a large projection of the solar disk depending on the configuration of the equipment.   

PictureThis is the sky map for the planets during totality for the April 2024 eclipse. Mercury, Venus, and Jupiter should be easily seen for most observers. Nepture and Uranus are telescopic objects even in dark skies, so don't try to look for them during the day. Saturn and Mars, easily visible at night, will be tough to see because they will likely have already set below the horizon. The exception is if you catch the eclipse when in Mexico...a morning totality means you might catch Saturn and Mars high in the sky, though you'd miss Jupiter in that case.
Natural Observations at Totality

Did you know that when the sun is totally covered in an eclipse, it will actually look dark outside?   Certainly, you shouldn't expect it to look like nighttime, but it does indeed get remarkably dark - and noticeably more cool -  enough to trigger the sensors of any street light around you, as well as any canine friend you brought with you!   Animals, especially insects and birds, are known to respond strangely to total solar eclipses!

Because of the darkness, some of the brighter stars and planets will become visible during the daytime.   During the August 2017 Total Solar Eclipse, the planet Mercury was clearly seen nearby - shown on the left edge (at 9 o'clock) of my image at the top of this article.  This in itself is a rarity for even experienced astronomers and observers, as Mercury seldom gets far enough from the sun to actually see it, unless an observation is made with clear horizons and at greatest elongation (when Mercury appears furthest from the sun).  And even then, the sun has to be below the horizon for Mercury to appear.  But for the April 2024 eclipse, Mercury and Venus will be obvious, as might Jupiter if your eclipse location puts totality closer to its zenith (the highest point in the sky), as it will for most observers in Texas.  These planets will all be in a straight line (or arc) from east to west, as shown in the sky map at right (click to zoom).

For perspective, Venus will glow brightly around 20 arc degrees to the east of the main show, which is around the width of two human fists held out at arm's length.  

Another observation you might see is when the solar disk is completely covered, the horizons take on a reddish sunset appearance the entire 360 degrees around you, which becomes obvious if you are observing the eclipse from a location where the horizons are clear.   And if you miss that, note that bright colors will have become substantially more muted in an observation known as the Purkinje Effect.  What happens is that your color sensing "cones" struggle to send signals to the brain because they have fewer photons (less light) to fire, so the luminosity-sensing (black & white light) "rods" take over.  Now this is something you could observe at dusk on ANY given day, but it's a fun thing to notice in the afternoon because of the eclipse!   So have those in your party wear a brightly colored shirt to give you enough targets to view around totality. 

And while you are doing that, especially if you find yourself out in a field, be sure to listen to any insects, especially crickets, as they will let you know night is coming even before you notice it's getting dark.  Of course they think night time is approaching, so the trick is on them!

The final, indirect observation around totality is to make note that any low-level, fluffy clouds in your area might have disappeared as totality gets closer!  This is because those clouds needs a constant flow of convection (heat), also known an "thermals," from the earth rising into the sky.   As the earth cools during the eclipse, that cloud formation is disrupted and can make those clouds disappear if there is enough of a temperature change.  Don't expect all clouds to disappear - you need to be some place else if there is THAT many clouds.  But many of us Texans are used to seeing summer clouds disappear near sunset, so the dynamic can be much the same during the eclipse. 


Direct Observations at Totality

As totality approaches, your eye will naturally look up and realize the eye will tolerate a DIRECT view.  Cameras, telescopes, and eyeballs alike can take in the entire show directly, without a filter.  As this is happening, perhaps 10 seconds to totality, there are THREE keys aspects of eclipse to watch for around the moments of the Second and Third Contact (entering and leaving totality).   

The first event, known as the Diamond Ring, occurs as the sun almost completely diminishes behind the lunar disk right before Second Contact.  At that moment, the disappearing solar light will appear on the edge of the lunar disk, tangent to the circular disk of the eclipse, resembling the glow of a diamond ring.  If looks terrific in photographs, but is a very fleeting moment in the eclipse cycle.  So to observe it, you will want to have a telescope or binoculars of good magnification...and as totality approaches, you will want to time your removal of the filter(s) ever-so-slightly prior to that event.  Too soon, and safety is a concern, but too late and you miss the event.  If safety is a concern, then don't play around with this...wait until totality to remove the filters.  However, if you are observing around others, you will hear people talk about it...and you will certainly see it in photographs afterwards.   The "ring" also occurs just after Third Contact, just in reverse.  In fact, this is a good way to see it since the diamond glow, coming a second or two after Third Contact, is a good signal to put the filters back on! 

The second event is what we call Baily's Beads, which happens a second or two after the "diamond ring" and marks the very last moment of the moon completing covering the sun.  It occurs as remnants of sun light (the last of the solar disk) peaks through the lunar mountains that stick out from the edges of the lunar disk - surely you didn't think the moon was featureless, did you?  When this occurs, momentarily as it is, the last of the sunlight appears as a string of beads around the eclipse disk.  It's a great moment to capture visually if you have enough resolution to see it (through a telescope).   Again, Baily's Beads will also occur upon the sun's exit from totality, so you have two chances to catch it.   As a matter of practice, many observers or photographers will try to catch Baily's Beads at Second Contact and the Diamond Ring at the Third Contact, so as to be able to focus specifically on each goals - and the Diamond Ring at the end of totality tells you to reapply your solar filters.  Plus, trying to catching both events at the same contact is difficult because they happen within seconds of each other.  The Baily's Beads phenomenon is named after Francis Baily, who first wrote about it in 1836. 

The final event at totality I have already mentioned, and that is the brilliant display of the solar corona and prominences.  Relax, as you will have all of totality to absorb what you will see, so unlike the Diamond Ring or Baily's Beads there's nothing subtle or tricky about it.  It is prominent and obvious, not requiring any equipment (binoculars are preferred), special timing, or searching.  It will hit like a ton of bricks and is basically why we say that such a visual can be "life-changing."  

The solar corona is the sun's outer atmosphere, where plasma emanates from the fusion factory that is the sun and streams away from the star's surface.  Because it is less dense than the sun itself, it is MUCH less bright and is always hidden from us, washed out by the sun's bright light.  But on eclipse day, when the solar surface is covered by the moon, we get to see it in all its glory, radiating many solar disk "widths" across the sky.  It's simply spectacular...none of us really knowing how it will appear or what shape it will take.  What is fascinating, scientifically, is that the corona itself is approximately 200 times hotter than the sun's surface, which is baffling to everybody, including scientists.  Temperature is supposed to dissipate when moving farther away from a heat source, not multiply by a factor of 200!  There is some thought that the plasma particles are so magnetically charged by waves of high-frequency, that it powers a cascading, runaway thermal heat dynamic.  Perhaps it's like a giant, cosmic microwave oven?  

The prominences, as described earlier, are plasma loops that erupt from the solar surface, seen by us as flames that curl along the magnetic field lines of the sun.  Not to be confused with flares, which are ejected particles, prominences remain bound to the sun, boiling and streaming away from the edges of the solar disk, from our perspective.  Typically, there is always prominence activity, but like the solar corona, this cannot be seen by the overwhelming brightness of the normal sun.  A special hydrogen-alpha equipped telescope can reveal these features at any given time (see the gold colored telescope in the slide show below).  However, it's not needed when you have a moon willing to block out all the sun's light for us.  As such, the appearance will be a solid black lunar disk with pink/red flames fringing the black disk, backlit by the white corona itself.  The prominences can take on a variety of different shapes, such as spikes, looping flames, groups, and even massive "hedge rows."   When you see the prominences, keep in mind the scale of what you are seeing, as even the smallest ones will jettison several widths of our own earth! 

Using some unfiltered binoculars or a telescope at totality offers the best way to appreciate the solar prominences.  But even so, they will be obvious with the naked eye.  

Totality is the closest you'll ever see with your natural eyes what the sun really is, namely a huge, powerful orb of seething gases.  And for most everybody who sees it for the first time, it will be one of life's most special experiences. It's simply unforgetable!

Photographing the Eclipse

It's just hard to resist capturing or recording an event like a total solar eclipse for the sake of posterity.  I would venture to say that there hasn't been a single day in the past decade of your life that you DIDN'T take a picture of something.  Photography is just so accessible, both in terms of how we TAKE and VIEW images.  If you want something really cool to put on "Insta" or Tic-Toc or Facebook, then reach into your pocket and have at it, because April 8th will give you no shortage of great things to shoot! 

Buy don't let your compulsion (or obsession) to photograph the eclipse make you miss out on the spectacle of what is happening.  Many photographers I know opt to program their systems to automate their images just so they can spend totality enjoying the eclipse.  Procedures, like focusing a camera and bracketing exposures, can interfere with your enjoyment of the event.

That said, let's look at many things you can do on that day!
​

Using Your Phone

At its most basic, try photographing your indirect observations that  I discussed above.   Notice the slide show at right, which are pictures taken during the 2017 event.  Many of those images capture the observations that many of the folks around me were doing.   Likewise, the video toward the end of this article shows a video of the 2017 event right at totality, which permanently documents not just the eclipse, but many of the people and activities involved.  As wonderful and amazing as the eclipse is, the people and activities around you add to wonderful memories you will take home with you.   So use your camera phone to make a record of the event - and then brag about them on your favorite social media sites. 

"Don't let your compulsion
(or obsession) to photograph the eclipse make you miss out on the
​spectacle of what is happening." 
With a telescope, it's quite natural to put a phone up to eyepiece to take a picture of whatever you see.  If that's the moon, then you'd be amazed at what you can capture. Similarly, when you are observing an eclipse through a filtered-telescope, then why not snap some shots to take with you?   

If you see me on eclipse day, just ask me and I'll let you do just that!  

But be careful when taking direct images of the sun.  The moment that any optics magnify the sun and concentrate those rays through a lens and onto a camera's focal plane, damage will be done if there is not a filter in place.   Keeping that in mind, you shouldn't worry about taking images of the sun with just your camera phone.  One of my recommendations is to set the phone on a tripod, set the zoom to a very WIDE field of view, and take occasional images.   The camera will adjust exposure according to light values coming from the sun and you can string together many exposures as the sun moves throughout the event.  Better yet, set up a TIME-LAPSE.  Many phones have this function, creating a video at the touch of a button, leaving you to enjoy the eclipse.    With the proper exposures, the phases of the eclipse can be seen, particularly right around the moment of totality.  


If the camera is able to properly "meter" the scene, meaning that it adjusts the exposure length to match the brightness of the sun,  then those images can be composited into a single image using some photo design software like Photoshop or any number of "apps" available for your smartphone.  Likewise, if you set up your phone on a tripod, take one photograph of the scene, and then hold up your solar glasses to the phone as you take additional shots during the eclipse (don't move the phone), then you can capture the path of the eclipsing bodies through the sky similar to the images below.  Take your old phone with you to do this...you'll need your regular phone to do other stuff!
Picture
With a camera phone, this type of composite image can be captured. 1) Make the camera immobile, 2) Sacrifice a pair of eclipse glasses and put the filter film over the phone lens, and 3) take pictures at regular intervals over the entire event. At totality, remove the filter and replace when the sun appears. Many apps and applications can composite the images together to provide this result.
Picture
Using the same technique at left while using a camera with a lens, a scene like this can be captured and later composited together. This is especially true if you find yourself in a scenic vista closer to the ends of the eclipse path, when the eclipse happens closer to the horizon.

Picture

Photography with a "Real" Camera

With camera lenses upward of 200 or 300mm, many of today's DSLRs and mirrorless cameras can provide enough resolution to give some really nice shots throughout the entirety of the eclipse.  So if you already own one, it makes sense to use it.   It is a good way to capture all of the phases, which can later be composited into a variety of different images.  And at totality, the filter can be removed to capture the spectacle at its full glory.  Of course there are lenses of greater focal length, which are always useful, like a telescope - they are "telescopic lenses," after all - but such lenses are prohibitively expense, much more than a comparable telescope of similar focal length or aperture.  But if you have one, definitely use it.  

But long focal length lenses are really hard to hold steady, so the key to getting good photos of the eclipse is to make sure your camera is stationary.  This usually requires a camera tripod and suitable mount for your camera, but I've made due before by propping the camera up on a table (hard to do if the eclipse is high in the sky).  Once locked down, then a variety of shots can be taken similar to the ones posted above.   But having a tripod also opens up the possibility of using some longer local length lenses with your camera.  And if equipped with a solar filter, the tripod can give you enough stability to catch some nice closeup shots of the sun's features, such as sunspot groups - the sun will be in a very active cycle on eclipse day - as well as the surface granularity that a good white light filter can show.  

For a filter, you can use Baader film or the Mylar types and fashion it over the lens, but with most lenses doing such would interfere with the ability to focus.  Thankfully, there are solar filters made for camera lenses (see right) of nearly any size at reasonable prices ($30 to $50) that can be purchased.   All telephoto lenses have its front aperture size marked in millimeters...and an array of screw-on filters can be purchased of that same size.  Since the general purpose photographer doesn't often need a solar filter, they would more than likely already have a variety of Neutral Density (ND) filters that block a variety light sources, depending on the job, as well as filters that could serve to yield an array of effects, like color filters, polarizing filters, UV or IR filters, diffusion filters, contrast enhancement filters, etc.   It should be noted that NONE of these filters, if you already have them, will be useful during the eclipse.  They most certainly will not be safe.   

Most ND filter sets will come in powers of two, corresponding to the number of photographic "stops" with which you wish to darken the scene.  For example, an ND 2 filter is a one-stop reduction of light (doubling the exposure time of the typical image).  Something like an ND 256 filter would provide an 8-stop reduction of light (eight "doublings"), which you might find useful during the day to lengthen the shutter speed to capture water flowing over rocks in a stream.   At ND1000 (approximately 10-stops), the filters just go by powers of ten.  

The ONE neutral-density filter that WILL be safe is the one marked ND100000, meaning that it blocks all but 1/100000th of available light.  This is the amount of attenuation required of any solar filters and so it can be used safely for solar photography.   Do NOT try to stack lower-stop ND filters together.  It's not safe.

Let's look at some of the shots I would suggest using a camera capable of using individual lenses.

1) A clean shot of the solar disk - Whether you view the sun in white light or through a lovely h-alpha telescope, you will want to have a picture of the sun as it appears on the day of the eclipse.  The April 2024 eclipse lines up well with the active cycle of the sun, which means that there should be several notable sunspot groups on the solar surface.  A good white-light filtered image will capture that. This image on eclipse day is something I always try to get.  Similarly, with my h-alpha telescope, this big ball of burning gases looks awesome in photos - or in video, like with this one of the October 2023 Annular Eclipse I shot at right.  While I could do these full-disk images on any day, getting one on solar eclipse day is important. 

It also serves to nail down focusing, check exposure times, and test the alignment of a tracking telescope mount.  If using a telephoto lens, focus manually, as you do not want the camera to focus for you, especially since the solar disk might not be large and full-featured enough.  Many electronic cameras become confused by having nothing much to focus on. 
Also, when manually focusing, do not assume that the "infinity" symbol means you are in-focus.  Focus is CRITICAL and the proper focus is usually found by going to "infinity" and then backing off a smidge. ​
​

​Experiment by "bracketing" several images around this point, moving the focus ring ever so slightly between each photo.  Similarly, most cameras have "Live-View" to let you zoom in and focus with more precision.  In that case, you will want a tripod to hold the camera stationary.  If using a camera directly connected to the telescope, you will be using the telescope's focuser, not the camera lenses, so again make sure auto-focusing is OFF.   Regardless, you will want to cover yourself and the camera (not the lens or telescope) with a dark blanket to let you see the camera's display.  Or, using stiff cardboard, cut a lens-sized hole and slip it over the base of the lens as you hold it up to the sun.  In this way, you have a natural solar shield and can more easily see the camera's settings and displays.   Large paper plates work well for this too.  Think Chinet!
Picture
​​2) An image of the partially eclipsed sun - Nothing speaks "eclipse" like a solar image with a chunk taken out of it!  And if you can take a picture of the full solar disk, then this shot will be just as easy.  Moreover, taking an image at each phase of the eclipse in regular intervals also allows for creative expressions of the event, such as a composite photo of all the phases, like above.  

​Make no mistake that such images are better with a longer telephoto lens or telescope (along with matching solar filter).  And a tracking mount makes this really easy.  However, these images can be created easily with a 
handheld DSLR with suitably equipped ND100000 filter or solar film filter.  You will want to use either full-manual mode or aperture priority mode, locking the aperture down and adjusting your shutter speed as needed. Keep the ISO stable at lower values.

Experiment with shutter speeds, which will be quite fast in the uneclipsed and early/late partial phases and marginally slower (about 3 full stops) nearing totality.  With a tripod, you can adjust the camera's shutter speed predictably with an exposure chart (
see right).  There are also eclipse exposure apps for your smart phone.  You will need the tripod for exposures longer than 1/15th of a second (or so).  You likely want a shutter-release cable as well, so that you don't have to physically touch the shutter button, which imparts vibrations to the image at higher magnifications even if it's on a tripod.  Thus, you can take all the shots by handholding the camera, but you will want to keep the shutter speed (fast) and increase either the aperture or ISO of the camera to compensate. 

​​As a rule of thumb, if you keep aperture and ISO the same throughout the eclipse, the same shutter speed you used in the beginning at First Contact (C1) WITH the filter will be nearly the same as the totally eclipsed exposure WITHOUT the filter.  This allows you do develop a plan in advance by experimenting with your imaging techniques on days before the eclipse.  Just remember the settings of the camera, especially the shutter speeds you use when capturing the full solar disk with your filter. ​
Picture
When establishing your shutter speed, understand that exposure time is not an exact science. Your results can vary from these values. So these are merely starting points to try. Experiment with the starting value before the start of the eclipse and use those camera settings to begin your exposure run when it really matters! Then consult the table, noting the difference between various eclipse stages and how it trends. So, once you establish a starting point, then your overall exposure sequence can become more predictable. This table is courtesy of Mr. Eclipse himself, Fred Espenak. He hasn't missed an eclipse, ever, and his site at www.mreclipse.com is well worth exploring.

PictureFor those wanting to know everything there is to know about photographing the eclipse, try out this PDF guide from my friend, Alan Dyer. It's all of 11 bucks for 380 pages of detailed goodness. The download is immediate, so get started by clicking on the image to take you there!
3) The diamond ring and Baily's beads - These fascinating events will not pose much a problem with regard to execution when using the camera.  You will shoot using your fast shutter speed (filter-less), same as that you began the day with near C1.  However, it's the timing that can pose the issues.  One sure way to nail the timing is to use a phone app for the countdown.  Perhaps my favorite is one called Solar Eclipse Timer which gives audible countdowns for the main events in the eclipse sequence based on GPS for your location.  Using this, you can time your removal of the solar filter just right - you must shoot these events without a filter - and make sure you've set your camera for the proper shutter speed.  

Three other suggestions to help here...

First, with many DSLR and mirrorless "DSLM" cameras, there are settings for "burst" mode, meaning that when activated, it will fire off any number of images within a several second time frame.  The reward of this is that you will have a beautiful sequence of the appearance of the Baily Beads, including images that watch the number of beads slowly diminish frame by frame.   The risk of this is that the camera will miss-fire, or user-error will ruin any chance of getting ANY shots.  Likewise, burst mode freezes the camera's operation for a certain amount of time as it uploads the images to the memory card, making the camera useless for tens of seconds.  As a recommendation, I would capture these events manually around C2 and fire off such an exposure burst around C3.  You likely won't mind as much when the camera locks up since you'll be scrambling to put your solar filter back on anyway. 

That said, MAKE EXTRA SURE YOU PUT YOUR FILTER BACK ON!  Don't forget it.  You do have more time than you think.  The camera can handle maybe a minute before and after totality without any concerns, but keep in mind that your eyes probably cannot!  So, shooting using "Live View" on the camera becomes important.  You do not want to be looking through the camera's viewfinder at those critical times.  

The second suggestion to try is to bracket your exposures during these times by adjusting your shutter speed between shots.  In other words, instead of taking one image of a given moment, try to capture several quickly by varying the exposure length.  For example, if you believe that you should be shooting Baily's Beads around 1/4000 (based on the chart or experience), then perhaps fire off two faster images AND two slower images around 1/4000 as well.  This, of course, takes practice using your camera quickly in what is likely to be your first time doing it.  As a help, newer cameras sometimes have a mode known as "AEB" or "Auto-Exposure Bracketing."  This does exactly as it sounds by allowing you to trigger a program for a set of bracketed images.  But as with any more advanced technique like this, you must accept the risk of it not working during the moments you really need it to work.  So, unless you are pro and you've practiced many hours with it, then sometimes it's best to remember the K.I.S.S. principle of "Keep It Simple, Stupid"!

Lastly, you might consider practicing on THE MOON.   Lunar photography simulates many traits of solar imaging, as images of the moon WITHOUT a filter tend to be similar to solar exposures WITH a filter.   Likewise, it's just a good way to figure out your imaging setup, how to focus, and your confidence with execution, not to mention imaging the moon at all it's phases can become a wonderful hobby all it's own.  

If you do decide to use our moon as a skill builder for the eclipse event, then be aware that it will be in its waning phase for two weeks prior.  This means the moon will only be available to you later in the evening and the early morning hours when no humans are awake.  So, my recommendation is to begin your lunar practice sessions around March 13, 2024, when the moon is available in the early evening just after sunset and is nearing its first quarter.  In this way, you can carry on a solid 10 to 12 nights of practice sessions, culminating around 5 days past the full moon, which is still early enough for you to reach bed before midnight. 

Picture
During the August 2017 total solar eclipse, I actually missed Baily's beads in this eclipse sequence. Likewise, I failed to decrease the exposure length when I caught the Diamond Ring just past C3. This is why you prepare!
PictureI was very pleased to land my HDR composite image of the August 2017 Great American Eclipse on the cover of the Fall edition of Amateur Astronomy Magazine. Perhaps you can have your image of the 2024 Great American Eclipse on the cover of your favorite magazine too?
4) The coronal display - This, of course, is the money shot!  When C2 hits after Baily's beads, you can capture the beautiful display of the solar corona.  Be a little patient at first.  You have time to enjoy the shock and awe of the event first by just looking up and soaking it all in.  Then, get your game-face on and begin a series of images from where you left off with Baily's Beads, filter-less. 

​Remember, with the sun entirely behind the moon, it is dark-ish outside.  Not to the point you can't see, but certainly to the point where the camera's shutter speed will have to be adjusted throughout the sequence more than you might realize if you hope to capture the solar corona the way your eyes see it.   Our eyes are wildly capable of high dynamic range, meaning we can see extremely bright elements and dark elements simultaneously, as many as 20 "stops" or "doublings" of light intensity.  On the other hand, even the best cameras are capable of a maximum of 15 bits (stops), and likely much less depending on factors like camera quality, exposure time, signal/noise ratios, etc.   Said in the way most can understand, the camera cannot capture the WIDE range of darkness (the moon), extreme brightness (the solar limb and prominences) and the greatly diminishing darkness at the edges of the coronal boundaries that you can see visually.,,at least not in one image. 

Therefore, the only way to capture the full coronal display, just as your eyes see it, is to take many images, from short to long, and then composite them later using image processing techniques in a software like Adobe Photoshop.   There are tutorials online to teach how this is done, so if you can acquire the images and have the software then you too can form that HDR (High Dynamic-Range) composite image, like the one I took in 2017 shown at the very top of the article.  It might even be good enough to land on the cover of your favorite magazine (see left). 

So, how long must the exposures be to capture all the information needed for the full coronal display?   All told, my image of the 2017 event ranged from 1/3200 to capture the bright corona and prominences, all the way to 2 seconds to capture both the distance wisps of the faint corona and the "earthshine," which is the lunar's visible face shown in the picture made possible by sunlight reflected from the earth.  And honestly, I wish I had gone as long as 4 seconds with that exposure.  Note that the earthshine will not be detected visibly with the naked eye.  Our eyes are good, but not THAT good! 

Of course, to capture exposures longer than 1/15th of a second or so without inducing our own vibrations into the image, you will certainly need that tripod we've discussed or, better yet, a tracking mount for your camera. Moreover, you might want a telescope in the focal length of 450mm to 1200mm when using a full-frame camera.  Cameras with a "crop sensor" can manage with something in the 350mm to 1000mm range.  At longer focal lengths, the event will be difficult to keep centered on the camera's sensor.  So I would not want to try this type of image sequence without some way to easily and precisely re-center the sun between exposures.   Having a telescope mount setup from the outset to track the sun for you the entire day is a blessing, as all you need to do then is to fire off the exposure sequence.  However, some tripods have adjustment knobs for moving in slow increments and can be used with practice.  

As for the images themselves, it really isn't too difficult.   A strategy might be to start at 1/4000 shutter speed, increasing by maybe 1 or 2-stops until you get to 4 seconds.  That might look like the following...1/4000, 1/1000, 1/250, 1/100, 1/25, 1/10, 1/2, 1, 2, and 4 seconds. 

And again, triggering images of these exposure lengths by pressing the shutter button ON THE CAMERA most definitely will impart your own vibrations to the images.  So, have that remote-shutter release for your camera at the ready!  Alternatively, most DSLR/DSLM cameras can be triggered from a computer (connected to the camera) using software that normally comes from the camera.  Therefore, the laptop and cables is one more thing to make sure you have packed with you...and do not forget the extra batteries (charged) while you are at it!  

If you are concerned about having the time to shoot this sequence, then don't.   Or, if you are crazy enough like me to do it, give yourself extra time by being closer to the center-line of the eclipse path. This is where the extra minute of totality can come in handy.  You will be able to fire off the exposure sequence, as well as maybe enjoy the views of both the eclipse and your surroundings while not trapped behind a camera.  It will also let you not feel so rushed if you try to fire off another set of images around C3 for Baily's Beads again, or if you want to do another activity or observation for the time you have left. 

​​Perhaps you also have a time-lapse going on your phone as well?  Oh, yeah, you forgot about that, didn't you? 

5) Your eclipse part​y - One of the best photos to take is one with all those travelling with you, or even of all the new friends you will meet.  You will want to remember who is there with you; who shared the experience.  I was thankful in 2017 to have my friend, Ross, with me to document much of what was going on in both pictures and in video, the latter of which I have shared with you below.  

August 17, 2017 Total Solar Eclipse Video...

When you "chase" a total solar eclipse, here is what those activities can look like, captured here by my friend, Ross Lawrence, who travelled with me to Hopkinsville, Kentucky, where the eclipse path aligned with great weather to give the longest show around - 1 minute and 40 seconds of totality!

Trying to capture a total solar eclipse is fraught with peril.   In this video, you will see me dancing on the fine line of trying to execute my images while also trying to enjoy the moment.  Nothing works exactly like you planned when under pressure, especially when so many people are interested in what you are doing.   As a result, many of my own images didn't execute properly, especially those of Baily's Beads and the Diamond Ring.  But I have zero regrets about that!

Even so, the video is a neat look at many of the activities - several mentioned in this article - of that most special day.  And Ross captured the enthusiasm and excitement of the crowd so well. 
One interesting approach might be to combine a "selfie" with your travelling group with an actual eclipse shot at totality.

Unless you have somebody willing to snap the picture, this will require a tripod and a camera setup in a way to capture the moment of totality.  Of course, this requires the camera to be set on a timer...or in the case of a phone, you can choose a shutter delay and all get together for a few moments during totality to mug for the camera, angled to get the group and the eclipsed sun at the same time. 

Better yet, if you've triggered a time-lapse sequence to capture all the moments around totality (or longer), then consider having everybody turn around and hold still for 20 seconds.   Several frames in the time-lapse would then feature your observing party!  

Or, if you have a DRONE capable of shooting video, then perhaps you can figure a way to make all kinds of memorable videos, not just of your travelling party, but also of everybody enjoying such an amazing, singular event.  While I'm not sure I would use my drone to try to capture totality with it, I'll leave it to you readers to give it a try.  Just be sure you can legally use the drone where you have chosen to enjoy the event!  

More than likely, if you have a heavy agenda of capturing other photographs, maybe you should just have a videographer with you, equipped with a camera phone or GoPro, and let him just go wild with shooting everything, like my buddy, Ross, did for me in 2017. 

If you have done something right, perhaps you get people taking video OF YOU that you didn't expect, such as a local TV station wanting to interview you.  You can see my own interview during the 2017 eclipse below, at the end of the article!
Remaining thoughts...

Hopefully if you have made it through this article, you will have been convinced that a total solar eclipse is something you do not want to miss.  If you need more convincing, check out Dustin Sandlin of "Smarter Every Day" in this video (at right).   It also highlights many of the activities I discussed here.  

Despite the worries of traffic on eclipse day, you too will want to remain mobile.  Watch weather forecasts a couple of days in advance and plan to be in an area of high-pressure for your best chance of success.  April is a cloudy month for many people, so please do not let clouds get in the way of you witnessing this event in person!   
Many of the observations highlighted in this article can be witnessed at any solar eclipse, not just the TOTAL ones.  So my hope is that you will take interest in even the partial solar eclipses that we have, which happen much more frequently than do accessible total eclipses.  Likewise, there are lunar eclipses too, which are a completely different animal, yet definitely worth understanding and seeing.  They are frequent, albeit somewhat generic and lack-luster, at least compared to any solar eclipse. 

Many veterans to the hobby, such as me, often tell first-timers to not worry too much about photographing the eclipse or bringing lots of gear.  They'd tell you to be attentive at totality and look up with that singular purpose.   For me, this is lame advice for two reasons.  First, there are nearly 3 hours, from beginning to end, with wonderful observations to be done, and tons of excited people with which to share them.  Being involved from beginning to end is a wonderful experience.  Second, it's not all that difficult to snap pictures at the same time your jaw drops wide open in total awe of the spectacle.  You can multi-task!   The worst that will happen is that you forget to take your filters off of your telescope when you photograph it.  With some practice and preparation, anybody can take lovely pictures simultaneously while viewing the eclipse.

Toward the end of the video of the 2017 event, posted above, I had a flood people coming by to check how successful I was with my imaging attempts.  I was able to show everybody the images from the camera while going into "teacher mode" as people loved both what I had to say and what I had accomplished.  It's a feeling a great satisfaction, not only that the event was so wonderful, but that I accomplished my own personal objectives on the day.  I concluded the video by saying, "We need another one of these next week."  

While "next week" turned into nearly 7 years for us, we get the chance in April 2024 to do it all over again.  I hope YOU will find a place full of wonderful people with which to enjoy it.    I've talked a lot here about how important this event is from an educational perspective and as a singular, once in a life-time event.   But for somebody like me, who loves all things celestial, especially eclipses (and comets...I love BIG comets), I will get as much joy in watching OTHERS love the 2024 event as well.  This is my central goal and heart-felt desire.  As such, since it's unlikely we'll be in the same place, I hope that this article helps you create a memorable moment for yourself, as well as the impetus to begin a life-time worth of curiosity in all things found by simply looking up!  
Picture

My 2017 interview for a Bowling Green, Kentucky, news station...

One of the cool things about having a nice astronomy setup for the eclipse is that people think you actually know what you are doing!   

My equipment must have gotten the attention of a local television station.  The video below shows an interview that I gave.

You never know what can happen when you find yourself with around 200 like-minded strangers next to a Walmart parking lot to see something as special as a total solar eclipse!
Picture

Home

Gallery

Contact

Picture

Terms of Use

All images and content on www.allaboutastro.com
​are copyright by Jay Ballauer. 
​Permission for use and ​proper credit is required. 
© COPYRIGHT 2003 - 2025 ALL RIGHTS RESERVED.