Where to Setup Your Telescope
When I do public observing events, whether in front of my school or for another cause, I've learned that my needs are small. If they have accessible power, then I might show some ambition and bring an imaging setup. During the day, I'm bringing solar gear. Otherwise, I'll just bring a scope that I can push around. Even in my DFW skies, there is plenty to see up there. Dark skies would be nice, but they aren't required if you hope to make a difference in the lives of people. People are worth it.
At that point, I just want to keep from carrying stuff too far. I'm getting old and the equipment is getting heavier!
But when my ambitions turn to quality views of the sky, then a whole new set of parameters is defined, from packing all my gear, to travelling to the right site, to setting everything up the best way in just the right spot.
In this article, we will discuss some of the factors that go through my mind. Everything that I believe you should factor into an observing site decision is itemized as follows, starting, of course, with the geographical location itself.
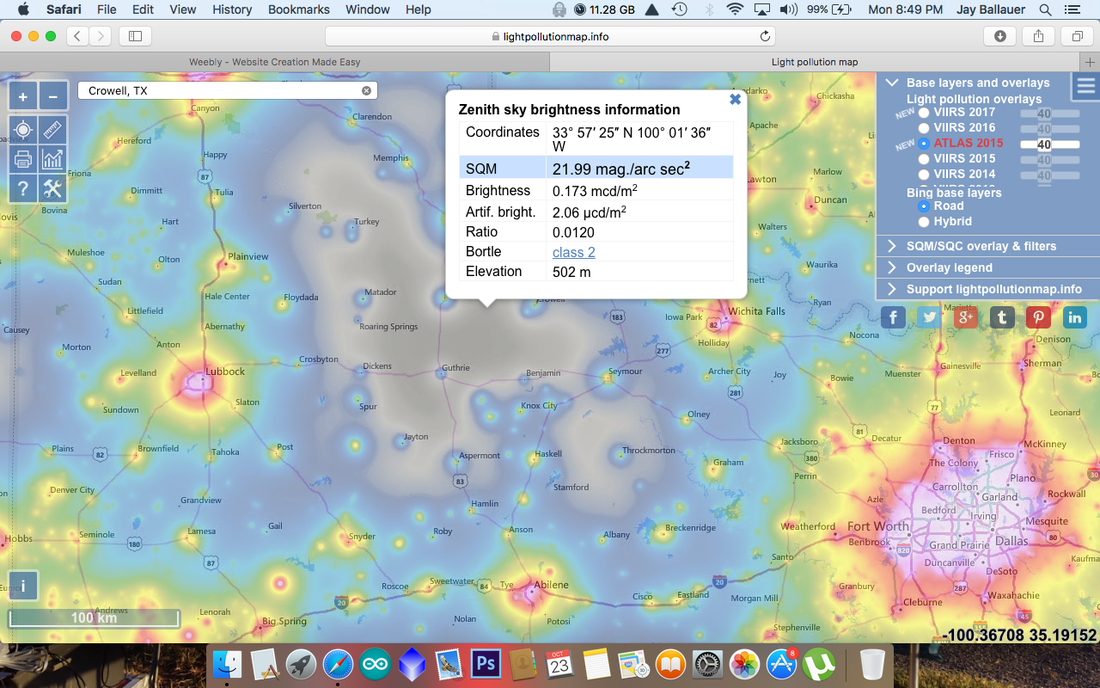 My favorite dark sky site, the Comanche Springs Astronomy Campus near Crowell, Texas, is less than 4 hours from my DFW home. This puts me in magnitude 7+ skies. The first step to "where" has to consider darker skies. Everything else pales in comparison when you are serious about getting the most from your telescope.
LOCATION
Whether you setup in your light polluted backyard or drive three hours to your chosen site, nothing will impact overall image quality more than this choice. Good location is as important in astronomy as it is in the real estate market.
For the serious astronomer, it's ALL about dark skies. We need photons from the objects we view, and dark skies give us the best access to those photons. While the convenience of being able to view from our backyards is a major player in the decision for getting involved in the hobby in the first place, even a partially light polluted location can really handicap your results.
How big is this handicap?
More than you probably know. To find out how much, take a gander at my article, "Do Dark Skies Really Matter." But for a quick synopsis, let me just summarize it this way: more than likely if you drive 3 hours away with your 3" scope, you'd get better views than if you had stayed at home with your 20" scope. City dwellers...leave home!
Once you've picked a direction to head, there are other factors that will come into play. Elevation isn't a key player, unless you can be WAY up there. As an example, my 3 hour drive to dark skies has better atmospheric seeing than a 10 hour drive to the almost mile-high Texas Star Party. Though if you could go1000 feet higher in the Davis Mountains, the seeing improves dramatically because you would have climbed above the "inversion layer," where warm air tends to settle above the cooler air trapped below it.
For planetary observers and imagers, the very best results are always found along the coast where the prevailing winds hit. Air moving over the ocean moves in layers parallel to it, without the rising and falling of air associated with rockier terrain. This "laminar flow" provides great atmospheric stability, good for terrifically detailed views of the cosmos. Of course, it's difficult to find coast line that doesn't have light pollution, so unless you can sail to a tropical island some place or go to the big island of Hawaii, then you'll certainly be limited to brighter objects.
PICKING A GOOD SPOT
So you found your location, but what now? When deciding to place your scope either "there" or "right there," you will want to pick an area that is out of the wind, but also away from trees and buildings. If you think that sounds impossible, then you would be correct!
But here's the thing...a little wind is your friend. If your mount is steady enough, or you aren't bothered by it when looking through an eyepiece, then wind can help equalize the local seeing, not to mention help to temperature acclimatize your optics. As far as trees and buildings, of course you want to position yourself in such a way that you have good line-of-sight to objects lower in the sky...and while you think that buildings might be a good shelter from wind, you need to realize how much looking over roof-tops can affect the quality of your views. Heat radiates, so you want to avoid looking through columns of it that rise into the night sky.
Speaking of heat, you probably realize that setting up in the grass is MUCH better than setting up on hot concrete or asphalt. In Texas, it takes half the night and early morning for the temperature of our sidewalks to cool off. You definitely do not want to fight the shimmering seeing caused by such localized dynamics! Similarly, I know you don't want to carry your heavy gear too far away from your car, but hot engines and body panels DO put heat into the skies you are looking through. Keep that in mind.
Quick Tip #1 - A water hose comes in handy...if you have no choice but to setup next to heat sources, washing them down with a water hose is a quick way to turn things into your favor!
Quick Tip #2 - If there is a small (or large) body of water nearby, setup next to it. Lakes and ponds do not radiate heat and they provide a consistent laminar flow of air (or wind) coming through your observing areas.
LOADING AND UNLOADING
You just pulled up in the SUV and are ready to unload the gear. Assuming you can setup right next to your automobile, or that you can at least drop off your gear without having to haul it across a field, then you've probably overcome a large obstacle to insuring an enjoyable night under the stars. While that does not necessarily equate to good views, at least you will assure that fatigue and back strains do not end your night before you use your first eyepiece or take your first focus frame. In many locations, you might not have a choice. If that is the case, then it will help to bring a cart, dolly, or wagon to transport your gear from the car to the observing sight.
Take it from me, one who has been seen running with a Paramount ME in my hands the length of a football field just so that I can do a public event. In retrospect, while such a demonstration of manly strength and exuberant youth boosted my self-esteem, it clearly showed a lack of intelligence on my part. If an astronomy mount could speak, my Paramount would likely say, "Somebody please stop this idiot from grinding my gears!"
You think I'm kidding? The aforementioned Paramount, over time, has suffered a 400% decrease in accuracy (periodic error) over a five year period due to so much field use - and I have to think that the way I carried it around had a lot to do with that.
So it goes without saying that there is more at stake in this hobby than just our backs. If at all possible, choose a site that is car accessible - and if not, be smarter than me about how you carry your gear!
(Please accept my public apology for equipment abuse. If you need to, go ahead and take a second to recover before continuing with your reading.)
Quick Tip #1 - When you buy equipment cases, or have them custom-made, be sure you include wheels, especially for large mounts. Bigger wheels are better when you have to pull them through grass and gravel.
Quick Tip #2 - I find that my smaller OTAs (optical tube assemblies) travel well in their cases. But travelling with the cases that hold larger instruments take up way too much space. The larger the instrument, the larger the case has to be - relative to the size of the scope - in order to properly protect it. The classical example is a large fork-mounted SCT. Unless you have a pickup or van, their cases take up a TON of space. So, I typically carry things like that loose, usually wrapped up in quilts (which I need anyway to sleep with), unless space isn't an issue and I can bring the case too. As I already mentioned, if I transport the Paramount, it gets the front-seat, selt belt treatment, riding along like the King it is. Other equipment that I have cases for, which I typically leave at home, are things like my instrument piers/tripods, the Tak TOA-150 (since it likely has rings on it that's I'd have to disassemble to put back in its case), and all of my counterweights. Just protect everything when you pack them and leave those bulky cases at home!
PLAYING WELL WITH OTHERS
Most of the places that provide us with favorable amenities for observing and high-tech astroimaging will likely be places we have to share with others. Because of that, we have to choose a site and set everything up in a way so that we aren't stumbling over everybody around us. Thus, where you place the tripod or pier should can depend upon your ability to move around and access your own gear.
Tarps or ground mats are a great thing. They have a way of defining boundaries and concealing extension cords that are otherwise trip-hazards. Use them.
Likewise, positioning your gear toward the edges of a larger observing field will not only provide easier access, but also less of an intrusion on those around you. As an astro-imager who spends a lot of time with his head buried in a laptop, it is nice if you can angle your laptop away form the line-of-sight of others. Even with a red filtered screen, it can still be a distraction to others.
As an veteran of doing astronomy in public settings, also keep in mind that you will likely find curious eyes wanting to check out your gear and your activities. Account for this. If you are at a public star party with $50,000 worth of top-of-the-line astronomy gear, or you are the only person on the field with that new 16 megapixel cooled astronomical CCD camera, then part of your night will be entertaining on-lookers. This comes with the territory. You opted to come to a star party, presumable to be around other people. If you just came for the night sky, then go setup away from everybody else.
Share with others. Thus, be accessible, both in terms of your agenda and your field location.
POLE ACCESS
Speaking to imagers for a second...one of the first things us Northern Hemisphere folks do is to check to see if Polaris is visible - I have no tips for South Hemisphere peeps other than to say I'm envious. The objective for us is to be able to align our EQ mounts on the pole star, Polaris. While technically we only need "north celestial pole" access, northern hemisphere practitioners use the nearby pole star for a quick determination of north polar alignment positioning. Southern hemisphere readers have a little more difficulty (so I'm told), but experienced astronomer's will still make a good approximation of the south celestial pole location visually.
While pole access makes it simple to set down a mount and get close to a good alignment right off the bat, it's not actually a necessity. Obstructed northern or southern poles do not equate to a useless setup position. Not only are there methods of polar alignment that do not require a visible polar star, but people familiar with a site can often use landmarks to guide their way to the celestial poles - we do such during daylight setups anyway - particularly if the mount's altitude settings haven't changed since the last session.
But if you are new to a site and need to see Polaris to know where to point your mount's polar axis, then picking a location with an unobstructed horizon will be some degree of importance.
ANCHORING DOWN
Once a year, somebody at the Texas Star Party learns a very difficult lesson as a dust-devil captures their telescope, lifts it up in the air, and slams it down on the ground. Likewise, canopies rolling across the observing field are a regular occurrence.
Did you know that one year at Okie-Tex, some dude's RV awning detached from his unit, flew 100 feet into the air, and landed on the fiberglass tonneau cover on the back of my pick-up truck? Put a hole right through it.
When you place tarps on the field, you steak them down. So too with your telescope, if you know that strong winds are a likelihood. NOTE: Don't use anti-vibration pads - they skid easily, they upset polar alignment on a simple bump, and they hinder your ability to anchor your telescope.
This is not something you take a chance with. Anchor down your gear. Place tarps atop your gear for protection. Use a quality scope cover. Bungie cords, stakes, ratchet straps, and zip-ties are requirements in this hobby.
 When you have a TON of stuff to carry, especially if you want to carry three setups, two for imaging and one for observing, then the conditions are ripe for forgetting something. It may be helpful to make a list.
TRANSPORTATION AND PACKING
I have carried an AP900 mount with PWT pier, a 6" Tak TOA-150 refractor, a 5" Sky-Watcher Esprit 120, a 4" Tak FSQ-106, and several cameras in the back of my Mini Cooper...dozens of times. When I take the Paramount ME on the road, I don't use a case. It sits by itself, in the front-seat, wearing a seat-belt.
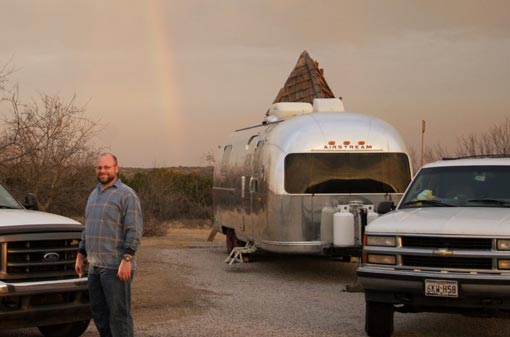
When I had a truck, back before I started renovating my 1972 Airstream (see above), I could throw every piece of equipment I owned in the back (and in the Airstream), hauling it everywhere I went. If I needed something on the road, it wasn't that I forgot it, or didn't have room for it...I just didn't own it yet.
How you get to the observing site is important. Plan how you pack - a place for everything and everything in its place. Have you left your counterweights at home before? I have. It's not good. But in my Mini Cooper, they sit under my driver's seat. My UPS (uninterruptible power supply) sits behind the passenger seat. My tarps sit atop everything, along with my TeleGizmos 365 scope covers. It's easy for me to load up - and now, I seldom forget anything.
Back in 2008, the amount of equipment I needed in order to go on a major star party was crazy. At that time, I would make a packing list (see above right) to assure that I wouldn't forget anything. I got to where I no longer needed it, but you should know that if you don't consistently do it, you'll end up forgetting the stuff you USED to pack.
Quick Tip: Once your car is packed perfectly, take a picture of it. You'll appreciate it the next time you need to pack!
As for the vehicle itself, you know the hobby has you in its grasps when you start buying your vehicles to facilitate your astronomy. I drive a Mini Cooper, which fits only the gear I need, and which serves as my only company on the trip. If I wanted to travel with the family or somebody else, then we'd have to take the big SUV. Once upon a time, I traveled places with a big dob, something I can longer do with a Mini. I used to carry around an 18" Obsession and was able to load it into a variety of vehicles, even in the back seat of a sedan. I would suggest that anything larger would certainly require an SUV, truck, or a trailer. Speaking of which, box trailers are a popular item at the major star parties, usually housing larger dobs greater than 20". Others might have a trailer to permanently store their astronomy equipment, just locking it up when it's not in use. Others go so far as to customize it where it doubles as a control center for their large imaging setups.
Because finding dark sky sites might also mean off-roading, a durable vehicle is quite wise. I hesitate packing the Mini for even a place like the Texas Star Party, because I know once I'm there I will be driving on a lot of gravel roads. Still others might have road conditions and off-road needs that go far beyond what I typically do, so ruggedness and safety become a concern. Trucks and SUVs make for good partners, especially if you also pull a box trailer or a travel trailer. But don't let driving a small car stop you from finding those dark skies!
I have carried an AP900 mount with PWT pier, a 6" Tak TOA-150 refractor, a 5" Sky-Watcher Esprit 120, a 4" Tak FSQ-106, and several cameras in the back of my Mini Cooper...dozens of times. When I take the Paramount ME on the road, I don't use a case. It sits by itself, in the front-seat, wearing a seat-belt.
When I had a truck, back before I started renovating my 1972 Airstream (see above), I could throw every piece of equipment I owned in the back (and in the Airstream), hauling it everywhere I went. If I needed something on the road, it wasn't that I forgot it, or didn't have room for it...I just didn't own it yet.
How you get to the observing site is important. Plan how you pack - a place for everything and everything in its place. Have you left your counterweights at home before? I have. It's not good. But in my Mini Cooper, they sit under my driver's seat. My UPS (uninterruptible power supply) sits behind the passenger seat. My tarps sit atop everything, along with my TeleGizmos 365 scope covers. It's easy for me to load up - and now, I seldom forget anything.
Back in 2008, the amount of equipment I needed in order to go on a major star party was crazy. At that time, I would make a packing list (see above right) to assure that I wouldn't forget anything. I got to where I no longer needed it, but you should know that if you don't consistently do it, you'll end up forgetting the stuff you USED to pack.
Quick Tip: Once your car is packed perfectly, take a picture of it. You'll appreciate it the next time you need to pack!
As for the vehicle itself, you know the hobby has you in its grasps when you start buying your vehicles to facilitate your astronomy. I drive a Mini Cooper, which fits only the gear I need, and which serves as my only company on the trip. If I wanted to travel with the family or somebody else, then we'd have to take the big SUV. Once upon a time, I traveled places with a big dob, something I can longer do with a Mini. I used to carry around an 18" Obsession and was able to load it into a variety of vehicles, even in the back seat of a sedan. I would suggest that anything larger would certainly require an SUV, truck, or a trailer. Speaking of which, box trailers are a popular item at the major star parties, usually housing larger dobs greater than 20". Others might have a trailer to permanently store their astronomy equipment, just locking it up when it's not in use. Others go so far as to customize it where it doubles as a control center for their large imaging setups.
Because finding dark sky sites might also mean off-roading, a durable vehicle is quite wise. I hesitate packing the Mini for even a place like the Texas Star Party, because I know once I'm there I will be driving on a lot of gravel roads. Still others might have road conditions and off-road needs that go far beyond what I typically do, so ruggedness and safety become a concern. Trucks and SUVs make for good partners, especially if you also pull a box trailer or a travel trailer. But don't let driving a small car stop you from finding those dark skies!
|
POWER REQUIREMENTS
As the hobby has gotten more technical over the past couple of decades, more and more people find themselves in need of power. Imagers seem in dire need of it, more than others. So, let's look at come considerations, as this does affect how you choose a site. In order to determine how much power your gear needs, you should add up all of your equipment's current draw (in amps) and estimate the maximum amount of power you might need at any given time. See the Table of Typical Power Needs for an imaging setup at right. Of course, it's nothing more than an estimate, since not everything will be running all at once. Imaging cameras and dew heaters are the big power monsters, which means 10 amps of power continuously. A slewing mount can be 3 amps. All the USB powered gear will be 0.5 amps a piece. A focuser and or scope controller could demand an extra 2 or 3 amps when they run. And if your laptop is running off its power "brick," it will need another 1.5 amps itself. Thus, at this point, a serious imager with heavy-duty gear running a dew heater (which is either fully on or fully off) could conceivably need 15 to 20 amps of constant power at any given time...more if you are running two scopes and cameras simultaneously! Whether setting up in the field or planning an observatory, those figures are important for you! |
TABLE OF TYPICAL POWER NEEDS
|
Now, understand that the type of power really doesn't matter. You can go AC or DC, whatever you have available, but running on DC power with batteries becomes somewhat impractical when you have big power needs, unless you have a permanent, remote observatory with a battery bank and solar-power!
On the other hand, visual observers have so little need in this regard, so any power requirements are easily met with a little "jump start" battery, which is sufficient enough to power things like mirror fans and stepper drives.
Either way, once the total current requirements are known you are in a position to make a decision...
DC Power Needs
For the most part, there's not a single power requirement we have that cannot be run off of a battery; thus, having a good portable solution to provide DC power, enough to last through the night, might be all you need. If that's the case, then you can pretty much setup anywhere; go anywhere. So for the MOST flexibility in where you setup, having your own supply of DC power is a great idea. Heck, even if there is AC power at a big star party, it's often nice to stay off the grid, especially when a breaker trips because of all the dew-slaying hair dryers.
|
The real advantage of DC power is that voltage supply is consistent, a requirement of modern electronics. But make no mistake, there's not a single piece of equipment that you cannot run off of batteries. In fact, even if the mount comes with an AC/DC adapter so you can plug it into the wall - such "bricks" rectify and filter the current into smooth DC for the electronics - you can usually bypass them entirely and get power straight off of batteries instead. Or, you can power them off an AC/DC inverter (see Sidebar: Non-12vDC Equipment at right).
I am a fan of group size 24 and 27 "marine" or "deep-cycle" batteries (AKA "wet cell" or "flooded") due to their reasonable cost and heavy load capacities in the area of 105 amp hours or more. This means that the battery can run a 1A load for 105 hours (or a 105A load for 1 hour). This is plenty of power for a consistent 10 amp current requirement (easily accomplished as long as you aren't running dew heaters). That yields an estimated 10.5 hours of power - enough to get you easily through a night of fantastic imaging. You do not see these often in the observing field due to their weight (perhaps 70 or 80 lbs.) but the price is right, typically around the ballpark of $100 to $120. But if you go to star parties that do not have AC power (like Rocky Mountain Star Stare), then you'd probably take TWO big batteries, just like me! Incidently, these batteries usually serve double-duty in my RV or boat, so keep that in mind. For less capacity, many people use smaller "gel" cell or AGM batteries. For example, a casual search on Amazon shows a 12V gel cell battery with 7ah capacity for $10. Many people will buy several such batteries, place them in a battery box, and connect them in parallel. For example, 5 of the aforementioned batteries hooked up like this would yield 12vDC power for 35ah worth of capacity, in a size and weight that many find manageable. These are non-serviceable batteries unlike the "flooded" batteries, and do require better chargers (with temperature monitoring). Likewise, you have to be careful not to deep-cycle these batteries. As long as you don't run them past 50% capacity, you will have more charge cycles. They generally run better in cold conditions than flooded batteries, which is worth remembering. Alternatively, if you are Mr. Money Bags then you'll probably go for some lightweight but expensive Lithium batteries. Greater care must be taken with them, but they are the future trend. Whichever way you go, whether its an off the shelf "jumpstart" battery or an complete DIY solution, be sure to do your research and get what your equipment requires, not neglecting chargers, connectors, and a good method of transporting heavy batteries across the observing field! AC Power Needs Almost every piece of astronomy gear that I have purchased runs off a cable that I can plug into the wall. This means that the kind manufacturers of my equipment have seen fit to give me the appropriate AC/DC adapters that let me run everything off of AC electricity. How nice of them! So for many of us, it's just too darn convenient to setup in a civilized location, perhaps in a state park with nice, AC powered campsites, at your observing club's dark sky site, or even in your own observatory out in your backyard. It's a quick solution, requiring no game planning or fancy systems. I carry a UPS (to give constant, clean power and surge protection), but otherwise it's a piece of cake. Just manage all the cables a bit and you are good to go for as long as you want. |
Sidebar: Non-12vDC Equipment?You might not realize this, but if you are an imager and if you've been around long enough, you've probably witnessed a few "portable" mounts that need more than 12vDC power to run. Some examples of this would be some Takahashi mounts that run on either 12v or 24vDC and the Software Bisque Paramount ME/ME2 that runs on 48vDC. Or perhaps you remember that the classic Meade LX200 actually ran best on 18vDC? So, when you are in the field with such gear, what is your solution? After all, your power source is likely a single 12vDC source. Well, the old Meade actually came with a DC-to-DC adapter so that you could run the 18v motors on 12vDC power. No problems there. Most other mounts can be powered with 12vDC directly, as well as most cameras. But no such luck with the other gear. If you want to run a Tak mount on DC power, then you can certainly connect it directly to a single 12vDC battery source. But this runs the slew motors at 50% of their potential. To hear the full jet-engine roar of the Tak, you would need to run on the full 24vDC, requiring TWO 12v batteries in series. And the ONLY way to run a Paramount entirely on DC power would be to put 4 such batteries in series. Some "wet cell" batteries do come in 24v, but then you'd need another solution (voltage divider) for any 12vDC equipment. But understand that such equipment typically comes with an AC/DC power supply, which allows you to power these DC mounts with AC "house" current (or mains). So, you could certainly use your existing AC/DC "brick" adapters to run your equipment in the field, but that requires AC power. To get AC power without hooking up to the AC mains you will need an inverter, which inputs 12vDC power (usually) and outputs 110vAC power (here in America). But take into account that you lose efficiency in the conversion, as much as 25% loss. Thus, if you have a battery that can supply 100ah of power, then you should expect only 75ah or less when used totally with an inverter. Interestingly, some users of DC only equipment might be better off powering their equipment through an inverter, especially if the lower voltage DC cables are running a great distance. Voltage drops over long runs; lower voltages drops much more than higher voltage. Thus, for such situations you will likely want your longest runs to be 110vAC. Leave the battery and inverter near the car and run a long extension cord for AC power to your setup. As for other equipment, such as laptop computers, you might need an inverter anyway, unless their internal batteries have enough power to last you through the night. |
 You won't see this kind of gear in the field very often, but when you do you'll likely see it powered off an extension cord instead of a battery. But an untidied mess of power bricks and cables can be bypassed with smart planning, no matter what you use or where you use it.
The Power Rail System
Bricks. They make great houses. And they let you use house current to power electronics. But one thing that ALL bricks have in common is that they are unwieldy blocks of unnecessary size, requiring twice as many cables as you likely need. How do you manage that? At one point on my setups, I've had two bricks for two Robofocusers, a brick for my scope controller, a brick for my USB hub, a brick for my mount, three bricks for cameras, and a brick for my laptop computer.
All because I'm trying to tap into AC power to run all of my DC gear!
When I just have a scope in the field, I tend to let cables and bricks hang everywhere, perhaps tied back with a few zip-ties. But if your setup is at least semi-permanent, then it might be a great idea to get rid of all the bricks and power your devices straight from DC. It reduces the total number of cables, allows for shorter runs, and yields an opportunity for a neat and tidy solution.
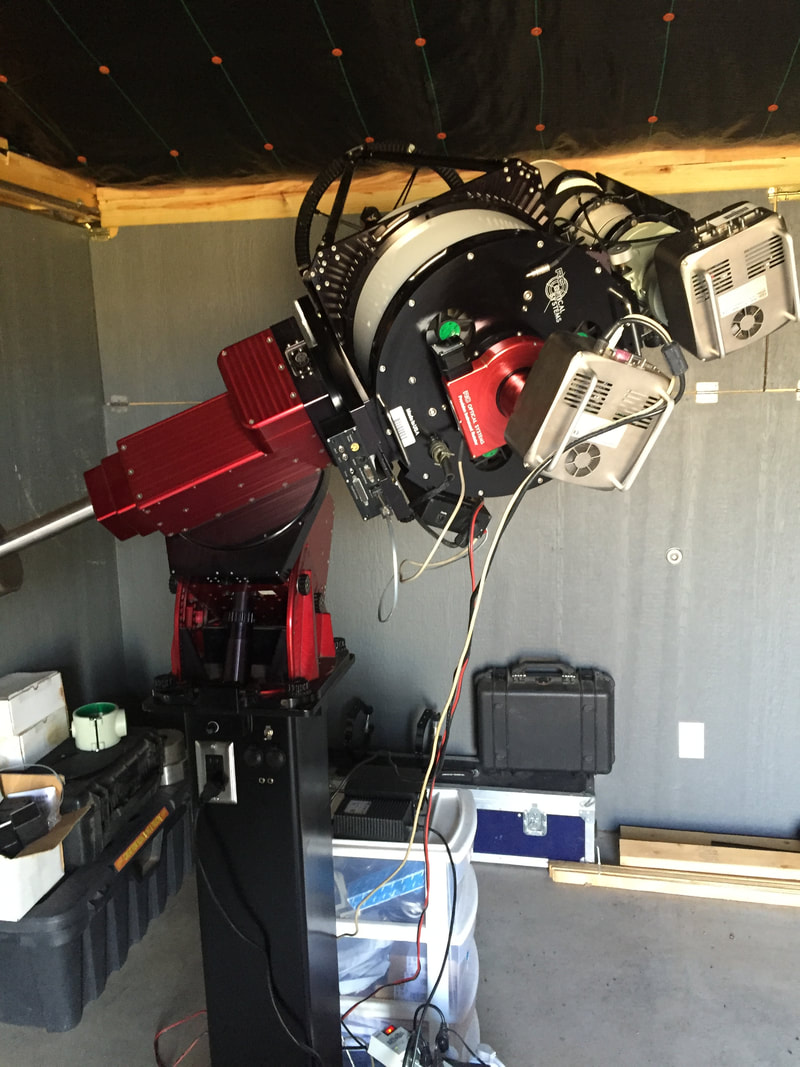
For my permanent setups, it's hard to beat a Powerwerx RigRunner Power Distribution Rail. It receives input power from your AC/DC power supply (I use Pyramid 10 to 20 amps supplies and route power cables through the Paramount, at right). It routes the power through individual in-line fuses and provides Anderson "power pole" connectors for output to all your DC powered devices. Modifications and/or DIY cabling terminated with the same power pole connectors is required. The Rigrunner is mounted on a rail attached to the saddle plate of the mount, hugging the tube (OTA) of the telescope itself. This puts a supply of safe, reliable power RIGHT NEXT TO all of your power hungry devices. This means short and tidy cable runs, all of which spin around with the telescope.
Route a USB cable through your mount and put a USB hub next to the Rigrunner alongside your dew heater and autofocuser controllers and you've got a slick, pretty, cable free set-up
The Rigrunners are available in many sizes and any number of outlets (I use 8 or 10 outlet versions).
There's nothing preventing you from using Power Distribution tools like these when in the field, as it does make cable management easier. But it's not something you want to disassemble each time either. Thus, to make it portable, you would have to compensate for how you transport your telescopes, since the added attachments to your scopes and mounts are unlikely to fit in your instrument cases!
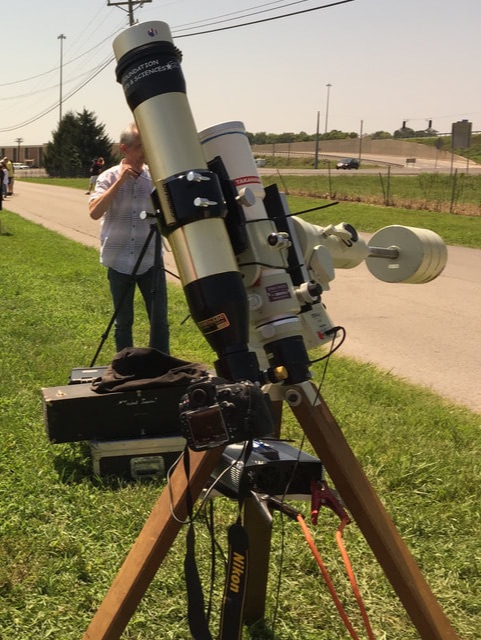
2017 Total Solar Eclipse Setup - First, notice the box on the tripod tray. That is an AC/DC Inverter, run from a big deep-cycle RV battery (not shown). My inverter is 3000W, which is overkill. A good 500 to 1000W would be good enough for this setup. Second, notice that the Takahashi is missing a camera. I had another DSLR, but I left my second camera adapter at home. Thus, I missed capturing the first part of totality because I had to switch cameras on the fly. "Be Prepared" is not just a Boy Scout motto!
|
Power Summary
As you can see, there are many variables to how you might want to supply power to your setups in the observing field. No doubt, you can see how important it is to consider such requirements when you choose a site. As a veteran of transporting all types of gear all over the place, setting up in a wide-variety of both powered and non-powered sites, I discovered that setting up with DC power in the field is a real chore with my gear. Because of this, I will always opt to find AC outlet somewhere for my typical imaging setup. For my solar gear, or simple deep space photography with a DSLR, I will sometime bring a big battery and inverter, running everything from the inverter (see left). This was my setup for the 2017 total solar eclipse...cable management be dammed. For visual observing or public observing, if I need power (with my EQ mounted refractors) I will find an outlet. If I know I will not have power, I typically will bring a Dobsonian scope...or an SCT with battery. Whatever your gear is, hopefully you'll be able to figure out your priorities and plan your power needs accordingly. CRITTERS If I had a dime for every time I came across a poisonous snake while in the observing field, I'd be able to buy a cup of coffee. Okay, so that's not much. Actually...considering that a cup of coffee is around $2.00, perhaps you are glad that you aren't me! Or, I could talk about the many times when I was by myself in the middle of nowhere and I had all-types of critters sneak up on me. I was attacked by a family of big raccoons once. Don't laugh...I didn't know they were raccoons when they were barking and howling at me! |
Or how about the number of times when I unwillingly setup next to a yellow-jacket nest?
And, mosquitoes. Oh, how I hate mosquitoes.
Be prepared for critters. Have a hoe next to you...bug spray...deet...pistol with rat-shot in it...whatever legal means protects you from critters...or at least bring a couple of changes of underwear.
You will be glad you did.
Quick Tip - Don't spray deet around your equipment. It doesn't treat optical coatings very well, among other things.
WEATHER AND COMMUNICATIONS
You absolutely have to love cell phones. Internet and voice communications always with you; that is, right until you reach dark skies. That "unlimited data" plan you just got? Nope, no service. There is a spot on the stairs of one of the bunk houses at TSP where I can get a signal if I face the right direction. At Comanche Springs Astronomy Campus (CSAC) near Crowell, Texas (3RF), which is my normal dark sky hangout, I can now get decent signal with my Verizon iPhone, but I got nothing with AT&T.
Being in contact with civilization is important. You really should call your family once a day. You will definitely need a weather forecast or a peak at the Clear Sky Clock. You most certainly will need to download an update or a driver for one of your astronomy instruments (unless you're actually prepared well BEFORE you left).
Of course, weather is not a respecter of persons, and it could care less if you have a cell phone or not. So what happens when you find yourself in bad weather?
In the spring of 2016, I brought my family and friends with me to CSAC for a weekend of camping and astronomy fun. Of course, some bad weather decided to meet us there, as shown below:
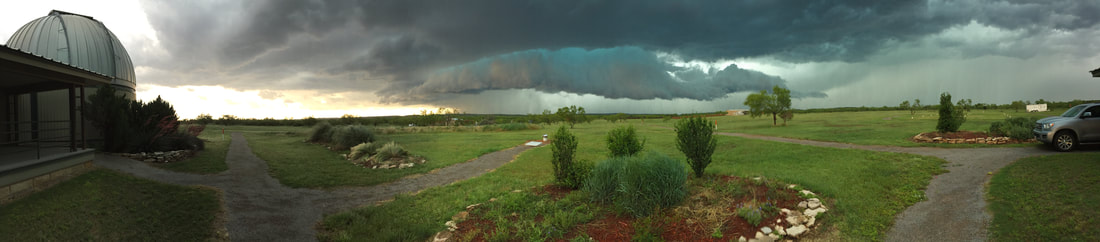
Tornadoes were in the area, a fact that I knew because I was in constant communication with my friend, Jeff Barton, who is the Director of Astronomy for the campus. Although we were spared of a tornado here, we all piled into the storm shelter until the weather had safely passed.
Had this been an astronomy-specific trip, without family and friends, I would have likely stayed home in the first place. Being aware of the weather in the days before a trip can save you grief later. But you should have a plan in case you do get caught in the storm, not only for yourself, but for your equipment. Again, tarps and stakes are important, as are area shelters.
Cold weather is something to plan for as well. I can't tell you how many times I've had to borrow a coat from Jeff because I wasn't properly prepared for plummeting temperatures in the drier west Texas fall and spring months. Winter is NOT the only time when you probably need a heavy coat. Also, be aware that equipment cannot wear a coat - extremely cold temperatures can cause lubricants to stiffen in mounts. Electronics have potential issues in frigid conditions. Eyepieces are difficult to hold with frozen hands. Also, imagers will need to focus their scopes more often as the temperature drops throughout the evening. Batteries definitely run out sooner in cold weather. There are a lot of factors to consider with cold weather, including who's bringing the hot chocolate!
Heat is less of a problem for many people, but in Texas it can quickly become oppressive during a huge chunk of the year. Taking care of yourself is the most important task. Bring water to drink and sunscreen for the body. Be aware of critter activity as well, since warm weather brings out them out in full force. Make sure your cooler has enough ice. Don't laugh - you don't want to be around me when the beer is warm.
 Taken at the 2012 Texas Star Party with the 6" Tak TOA-150 and SBIG STL-6303e. Taken at the 2012 Texas Star Party with the 6" Tak TOA-150 and SBIG STL-6303e.
OBSERVATION PLANS
If you are doing solar observing - or moon and planets for public outreach - then WHERE you setup isn't important. But for the dedicated observer or astro-imager, your location and specific site should account for the specific things that you want to see. For example, many people who come to TSP for the first time are excited to see Omega Centauri, since it rises an amazing 11 degrees above the southern horizon. But it's only amazing if you position your telescope away from enough trees and mountains to actually see it. Not just that, but at a star party, it's very likely that your dob might be blocked by the telescopes of people setting up around you. You will need direct line of sight to such objects. Speaking of Omega Centauri, I am excited to see it every year at TSP, but my first efforts to image it digitally were briefly thwarted. After aligning my telescope carefully for what seems half of the night, I didn't realize that I would be blocked by my neighbor's 6" refractor. See Sidebar: Omega Adventures at right. Many people, hoping to optimize their time under the skies, have their observing lists and imaging targets before they start. At TSP, you might be gunning for some observing pins. Perhaps you are going after your Messiers or Herschels for your Astronomical League certificate? How about doing a Messier marathon, where you orchestrate observations of all 110 Messiers on the same night? I'm not a list guy. i'm a wing-it guy, though I probably have a few imaging targets in mind when I go out. But if you ARE a list-guy (or gal), then you'll need to consider this when you setup your scope. ALL SYSTEMS GO? You've made it there. Everything is setup; ready to go. But then, a camera stops working. Or, you forgot about a required update to your astronomy program. Or, a USB/serial adapter goes down. Or, a USB cable fails. Perhaps, like me, you didn't check that you had BOTH of your DSLR adapters with you during the 2017 total solar eclipse and you were forced to switch cameras over just before totality - seriously, I missed the first 30 seconds of totality this past August because I switched too late from the h-alpha scope to the refractor and needed to get focused! (See 2017 Total Solar Eclipse Setup above.) |
Sidebar: Omega Adventures
I was transitioning at the time, beginning to experiment more with astro CCDs as dedicated imagers, rather than to "autoguide" my film images. Thus, my Nikon F2 SLR with Meade 208xt guider gave way to an SBIG STV, which I purchased to serve both duties, as well as to do live video observing for public outreach events.
All kinds of faint objects become visible in those dark skies, but Omega Centauri (NGC 5139) becomes THE prime target for all TSP participants who more than likely travelled somewhere from the north to be there. Pictured above is my shot of the object, taken during the event with the STV through the SCT on "super-wedge" with f/6.3 reducer. Obviously, the image above is nothing to be tremendously proud of, at least by today's standards. But, it's mine, and I was happy to capture it! If an object like Omega is a goal, then where you position yourself should be priority, since you will NOT want to re-align your equatorial setup when you realize that there's a big dob blocking your view. This was my situation for the above image. But when all is good and you have clear access to the photons, you can enjoy the year-to-year adventure of capturing or viewing a spectacular object like NGC 5139 every year. Here's a couple more shots of Omega (left and below). A lot of progress can be made over the years. Just takes practice...and knowing where to setup your scope in the first place! 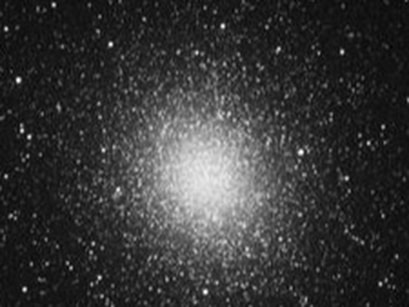
Taken one year after the above version at the 2004 Texas Star Party.
|

Or, you assumed that you had plenty of mylar solar filter material and could make all your filters the week before the eclipse, "No problem!" You guessed it...I had no white-light filters for the eclipse either, since you can't really find the filter material at the last minute!
One friend, long-time astro-imager, Jason Ware, is fond of saying that, "Star parties are for working on equipment." He makes this statement always in jest - but when you are husband to a wife, father of sons and daughters, boss to employees, and servant of people around you, then TIME isn't always on your side. For many of us, the last time you actually did astronomy was at the last major star party - or, at least, it might be the last time we used our portable gear!
If time under the stars is infrequent, then you have two choices before a major excursion - you can do a practice-run at home to assure that all your gear still does what you expect OR you can manage your expectations, accounting for the fact that something might go wrong and you might need to work on equipment the first night of the event. I have learned to do the latter and try not to get too upset when something isn't totally right!
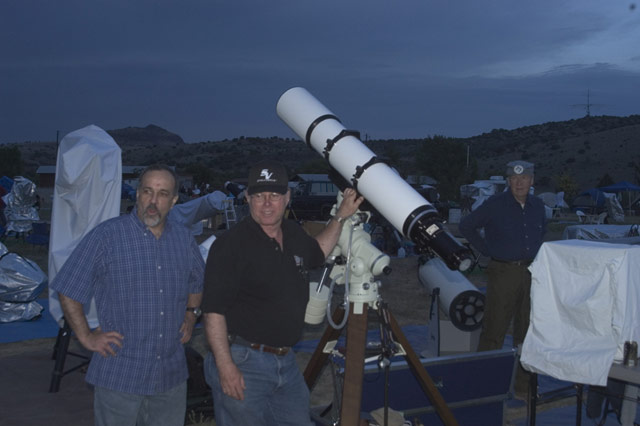 At TSP 2007, pictured from left to right are Vic Maris (Stellarvue), Jeff Barton, and Don Hopkins. Guys like these make the hobby so much more fun.
HAVE GREAT FRIENDS
One of the great things about the Internet and social media is how connected we are. I have found that people are very grateful and genuine in our hobby, especially if you give more than you receive. More than a decade ago, I decided that I would do less actual astronomy and do more mentoring and teaching. As a result, almost anywhere in this world, I can find a friend who I could stay with...somewhere I could do astronomy. And if my long-time internet friends needed a place to stay, my home would be open to them.
And when you have friends like Jeff Barton, somebody you've spent countless nights under the stars with, then you have a backup when things go wrong. Perhaps you too have people like Jeff, who not only make observing a blast, but who also seems to have two of everything and will loan you something when you left yours at home.
I feel that astronomy should be communal. The cosmos are too grand NOT to share with others. For this reason, WHERE you go should be largely determined by WHO you are with. While there is a place in this hobby to just "get away," escaping from the stresses of "real-life" and spending some quiet time alone under the stars, there is no place in this hobby for people who yell at others during a star party for accidentally flashing a bright light, or charge money for views through a telescope, or seem bothered by others who setup around them.
Green laser wars and 1,000,000 candle power spotlights are fun during cloudy TSP nights. Sampling some 20 year old Scotch is a privilege with your buddies. Stupid movie night in Tom Wideman's RV is a freaking blast...and usually perfectly timed during a week of clear skies anyway. Sometimes you just need a break. And besides, being by yourself is BORING during cloudy nights - which is 50% of the time (especially after buying a new telescope).
Having great astronomy friends is the BEST part of our hobby, no matter how many Herschel's you've seen or how nice your astrophotos are.
CONCLUSION
When I first started in this hobby in 1997, I kept my first scope, a 10" Meade LX-50 SCT out in the country. My friends, Ren and Leisha Young, were gracious enough to let me store my gear in their garage. And when I got a chance to visit from my residence in Fort Worth, Texas, their home provided a nice place to see quite a few objects during my first couple of years in the hobby.
Although I later built my own observatory in 2001 out in the DFW suburbs, I soon discovered that I wanted darker skies. I started seeking places farther away to do my hobby, places more remote. And when I began to really get good at this hobby, finding dark skies that met all of my requirements became a religion. State Parks became my friend - and I have fond memories of "camping out" in my Airstream with my scopes setup just outside.
Your needs will be different than my needs, but I have written this article with the objective of helping you to find the best place to setup a telescope, trying to account for all the variables; all of your potential needs. But I think there is a progression in this hobby, where your needs grow more and more about people and less about the tasks at hand.
For example, I have discovered that I really don't enjoy being by myself under the stars. I need somebody to share the skies with - the joy of seeing something together and the stories you can share as a result - these things are what drives me most. See Rocket Fuel Dump as an example of what I am talking about.
Wherever you end up setting up your telescope, my number one piece of advice is to share it with others. I've seen scores of amazing things under some of the darkest skies imaginable - but those memories fade over time. What hasn't faded are the experiences I've shared with others - the zaniness of a Lonnie Wege making you laugh all night long - the oohs and aahs of people seeing Saturn through your scope for the first time - the rattlesnakes you've sneaked up on and your friends who have devised new methods of killing them.
Believe it or not, you can actually run out of things to see, pictures to capture, or challenges to overcome. The body gets old and the motivations disappear. Perhaps this is the reason why you've built an observatory out in the boonies? Traveling with your gear to a dark sky site gets tiresome at some point.
Ultimately, I measure my success by the people I know, not the things I have seen or the number of images that grace these pages. You can never run out of people to meet and share the hobby with - this is what keeps things new and exciting.